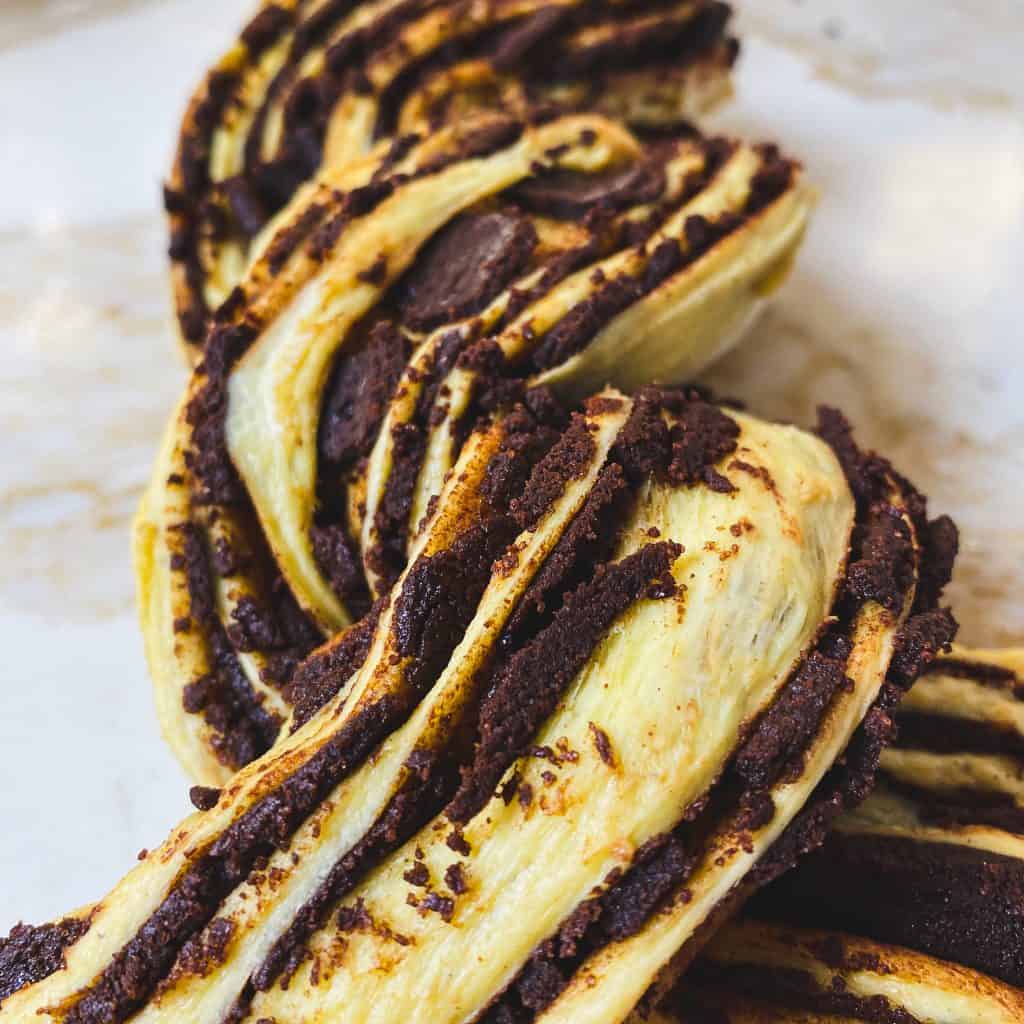
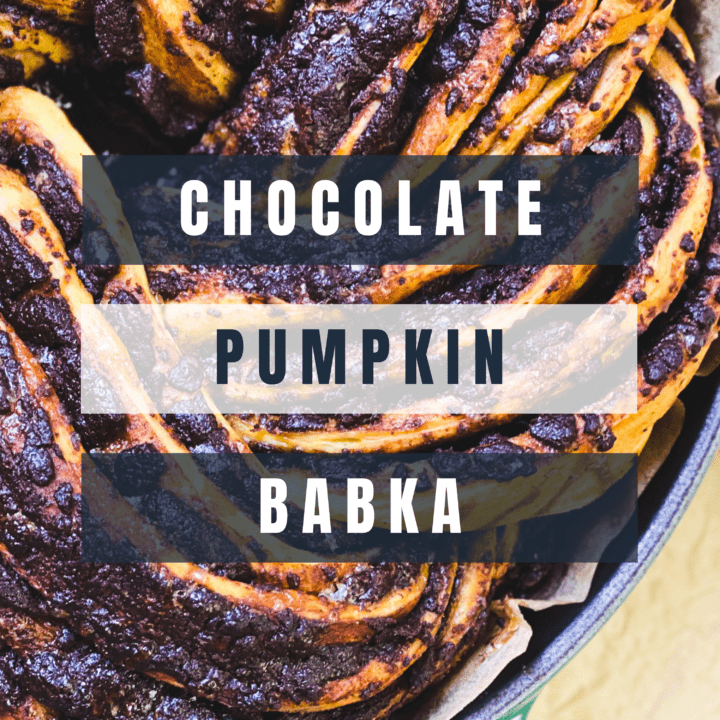
The Best Chocolate Pumpkin Babka Recipe
This Chocolate Pumpkin Babka is decadent, moist, and rich in flavour but perhaps most of importantly, beautiful. This polish babka recipe only looks complicated. If you can make cinnamon buns, you can make a babka!
I am a big believer that if something is visually appealing, it is instantly more delicious!
Cue the Babka…layers of sweet pumpkin brioche bread swirled with pumpkin spice and chocolate make this dessert a crowd pleaser. Take advantage of this fall season with all of the warm spices and flavours that this traditional Polish dessert has to offer.

It is hard not to think about the famous Seinfeld episode when making a Babka. Let me promise you Pumpkin Chocolate “takes a backseat to no Babka!”
What is a Babka?
Traditionally, a Babka is a sweet, braided bread originating from Eastern Europe. The polish word Babka literally means “grandma.” This grandma bread is often served at Easter time. The yeasted dough boasts intricate swirls of chocolate, cinnamon, fruit, or cheese. The dough is risen several times before it is rolled out and covered with filling. It is then rolled, cut, and braided. There are several ways to shape a babka including rectangular, in a circular, and even basket woven. This pumpkin babka is a twist on traditional babka that won’t disappoint.
There are several variations of a traditional babka including more of a cake-style babka called babka wielkanocna or babka drożdżowa z rodzynkami and often includes golden raisins. This type of babka is baked in a bundt cake pan and doesn’t have the brioche dough.
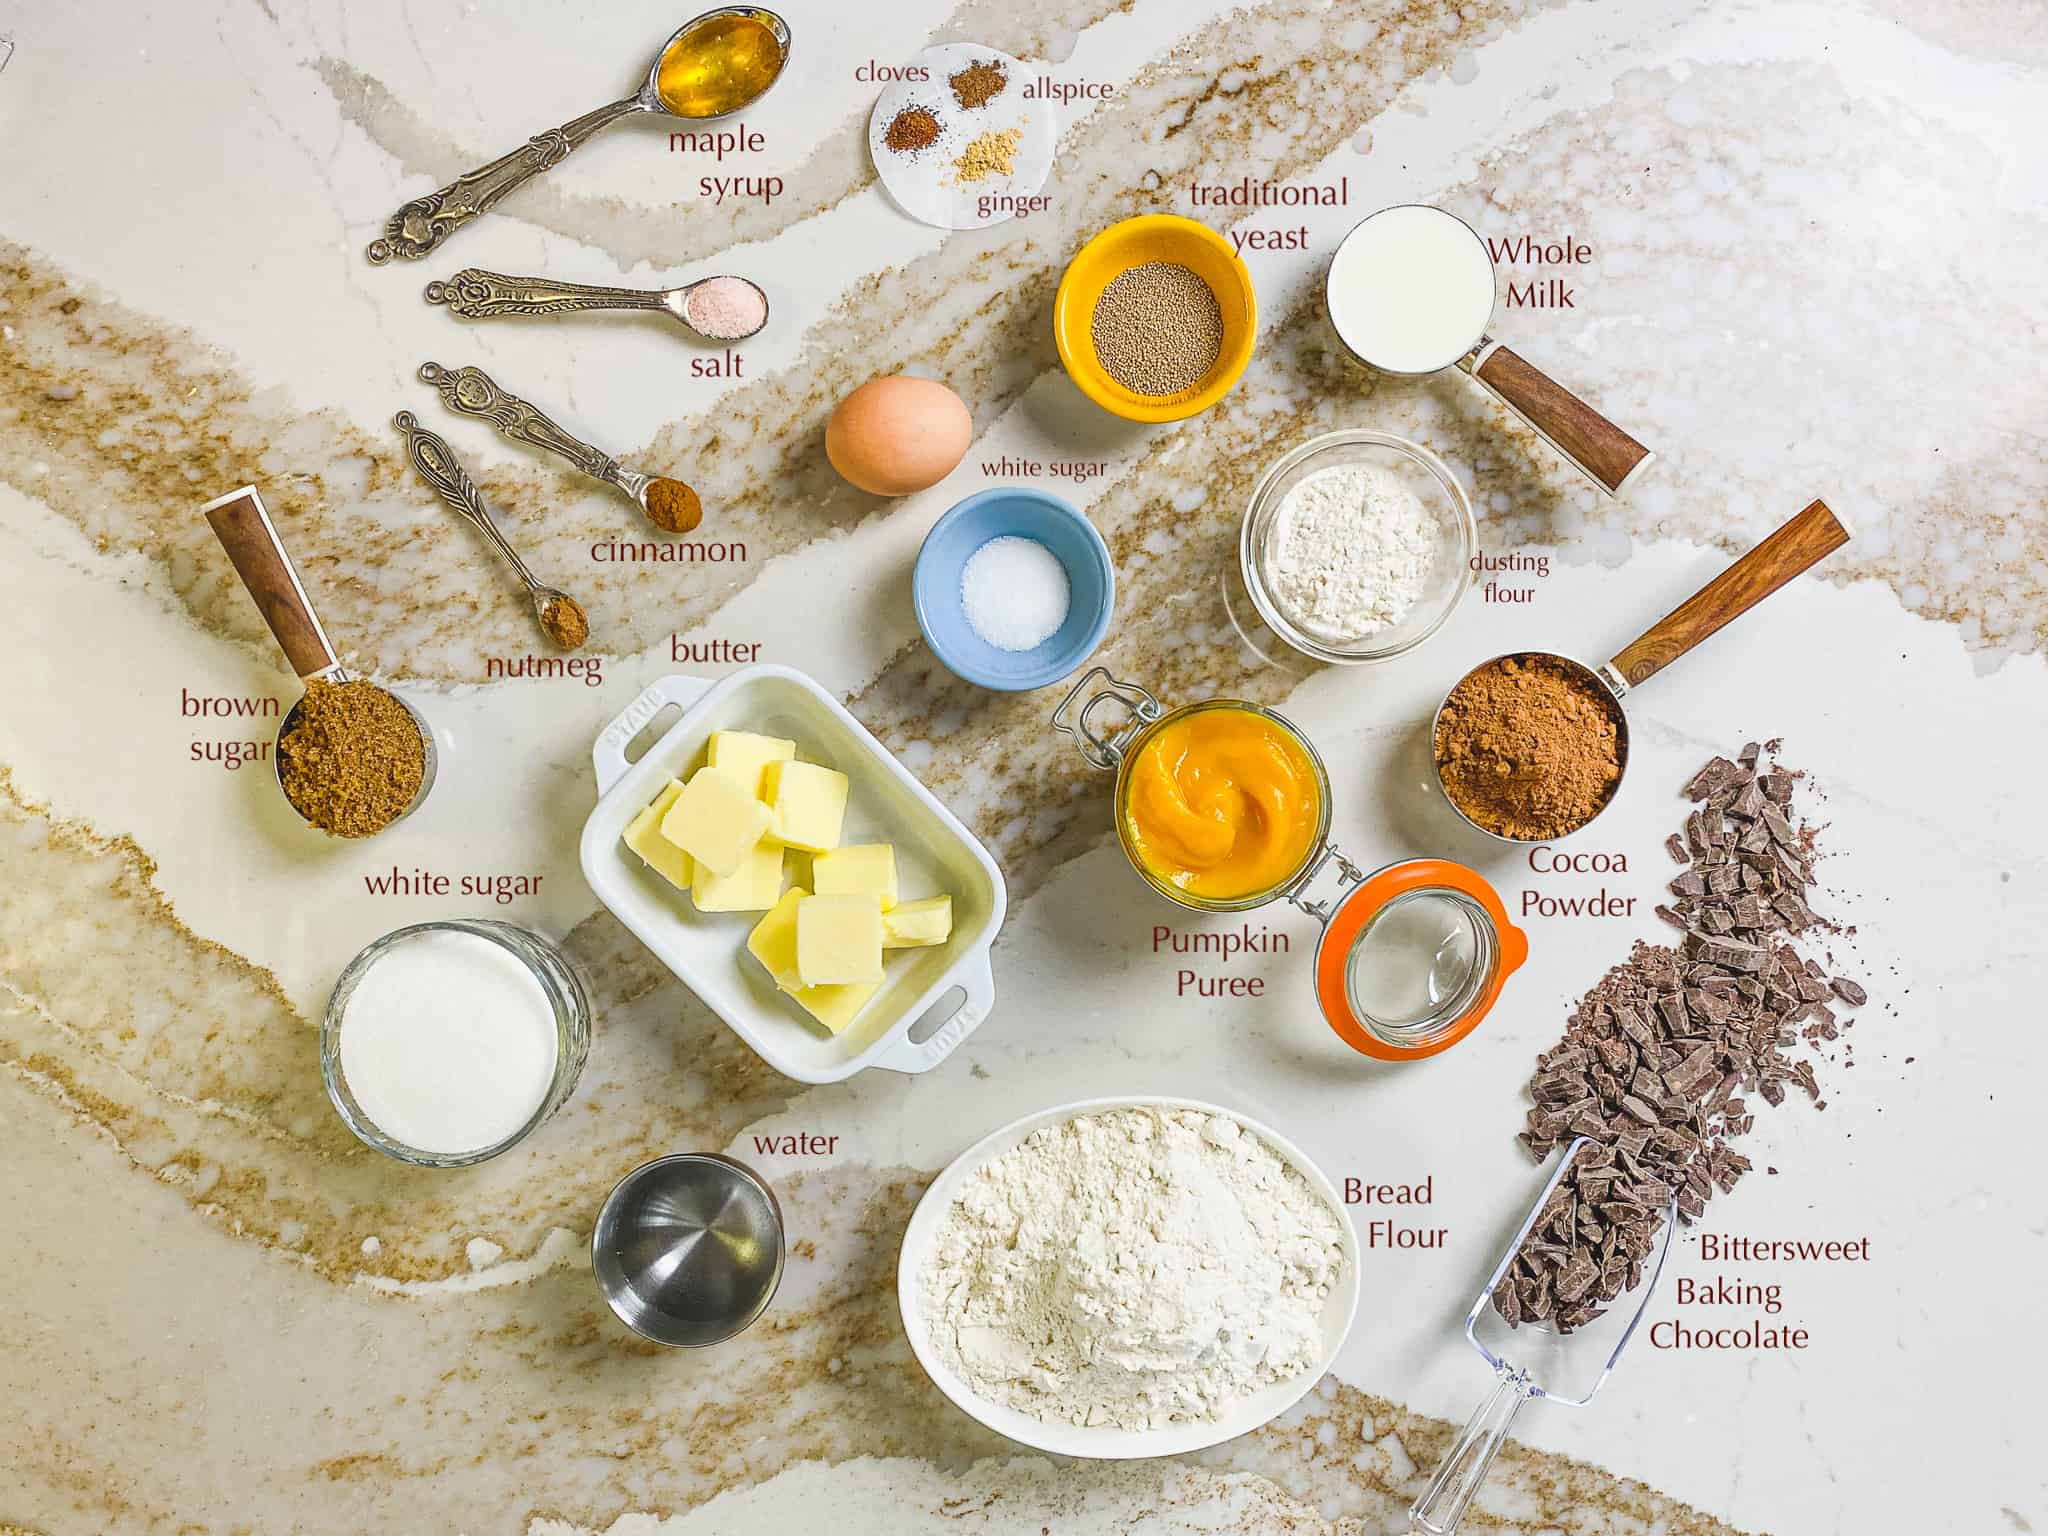
Key Ingredients:
Pumpkin Puree: This “Easter bread” is not reserved for Easter! My thick Homemade Pumpkin Puree suits this recipe perfectly and is ready to be prepared just in time for Fall! If you don’t happen to have time to make your own pumpkin puree, store bought will work just fine. If you opt for the store bought puree, ensure that you choose pure pumpkin puree and not pumpkin pie mix.
Chocolate: I used semi sweet bakers chocolate and finely diced it. Feel free to use whatever chocolate that you have on hand including miniature chocolate chips, small chocolate bars, etc… Note that using sweeter chocolates may take this already rich dessert to a whole new realm of sweetness (almost unbearably sweet). Choose your chocolate wisely!
Butter: I always choose salted butter but if you are watching your salt intake, unsalted butter will work as well.
Equipment Needed:
This equipment is all optional but definitely makes the job easier!!Rolling Pin
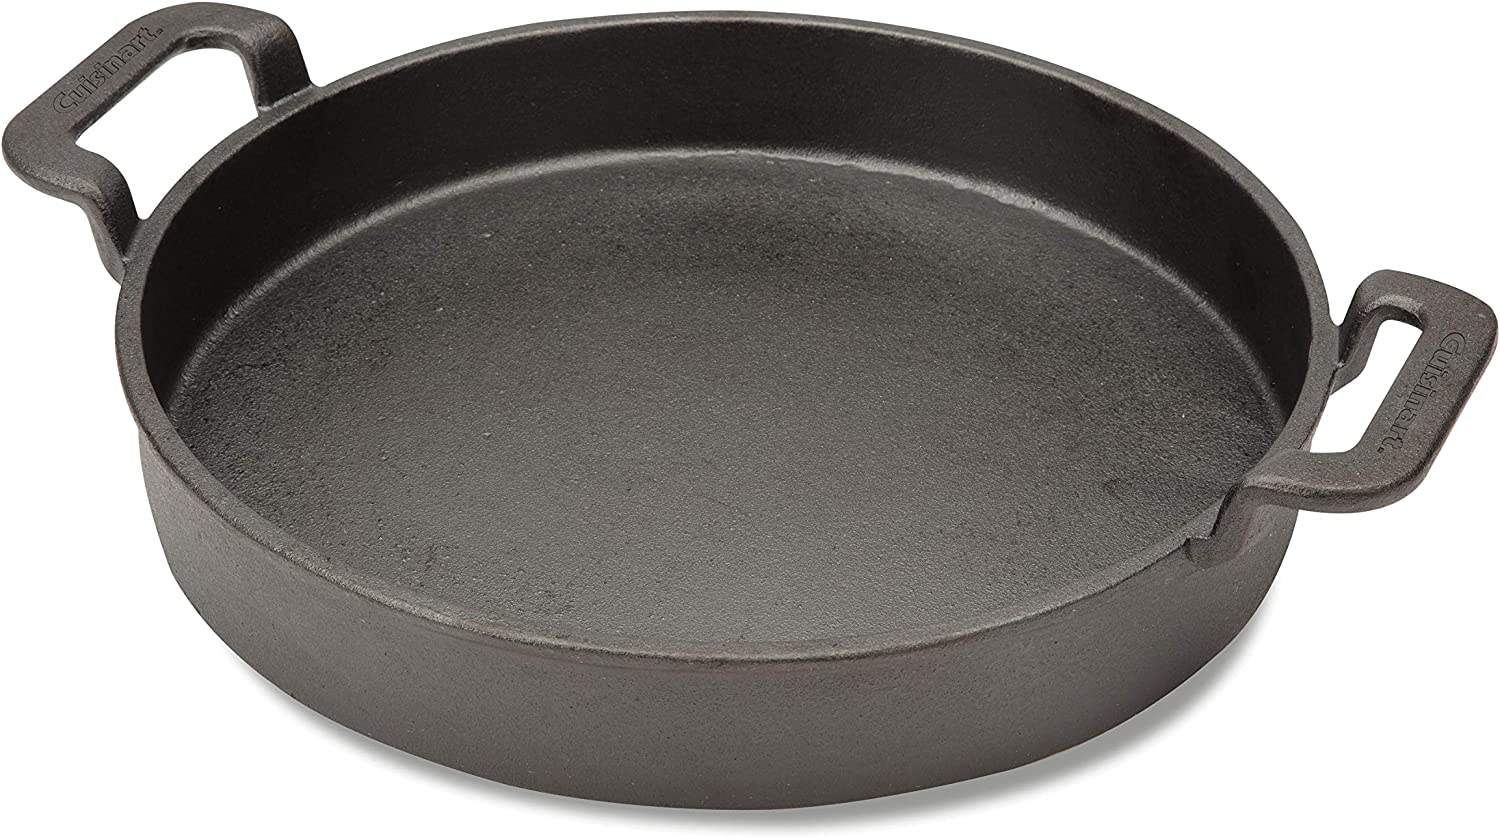
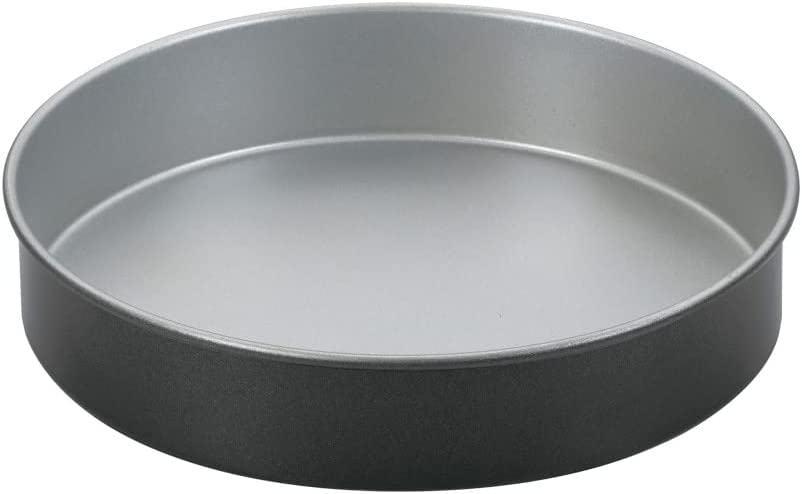
9 inch round baking pan or 10 inch cast iron pan. Alternately, you can use a large loaf pan to cook this sweet bread but you will need to adjust your cooking time from 30 minutes to 40-45 minutes.
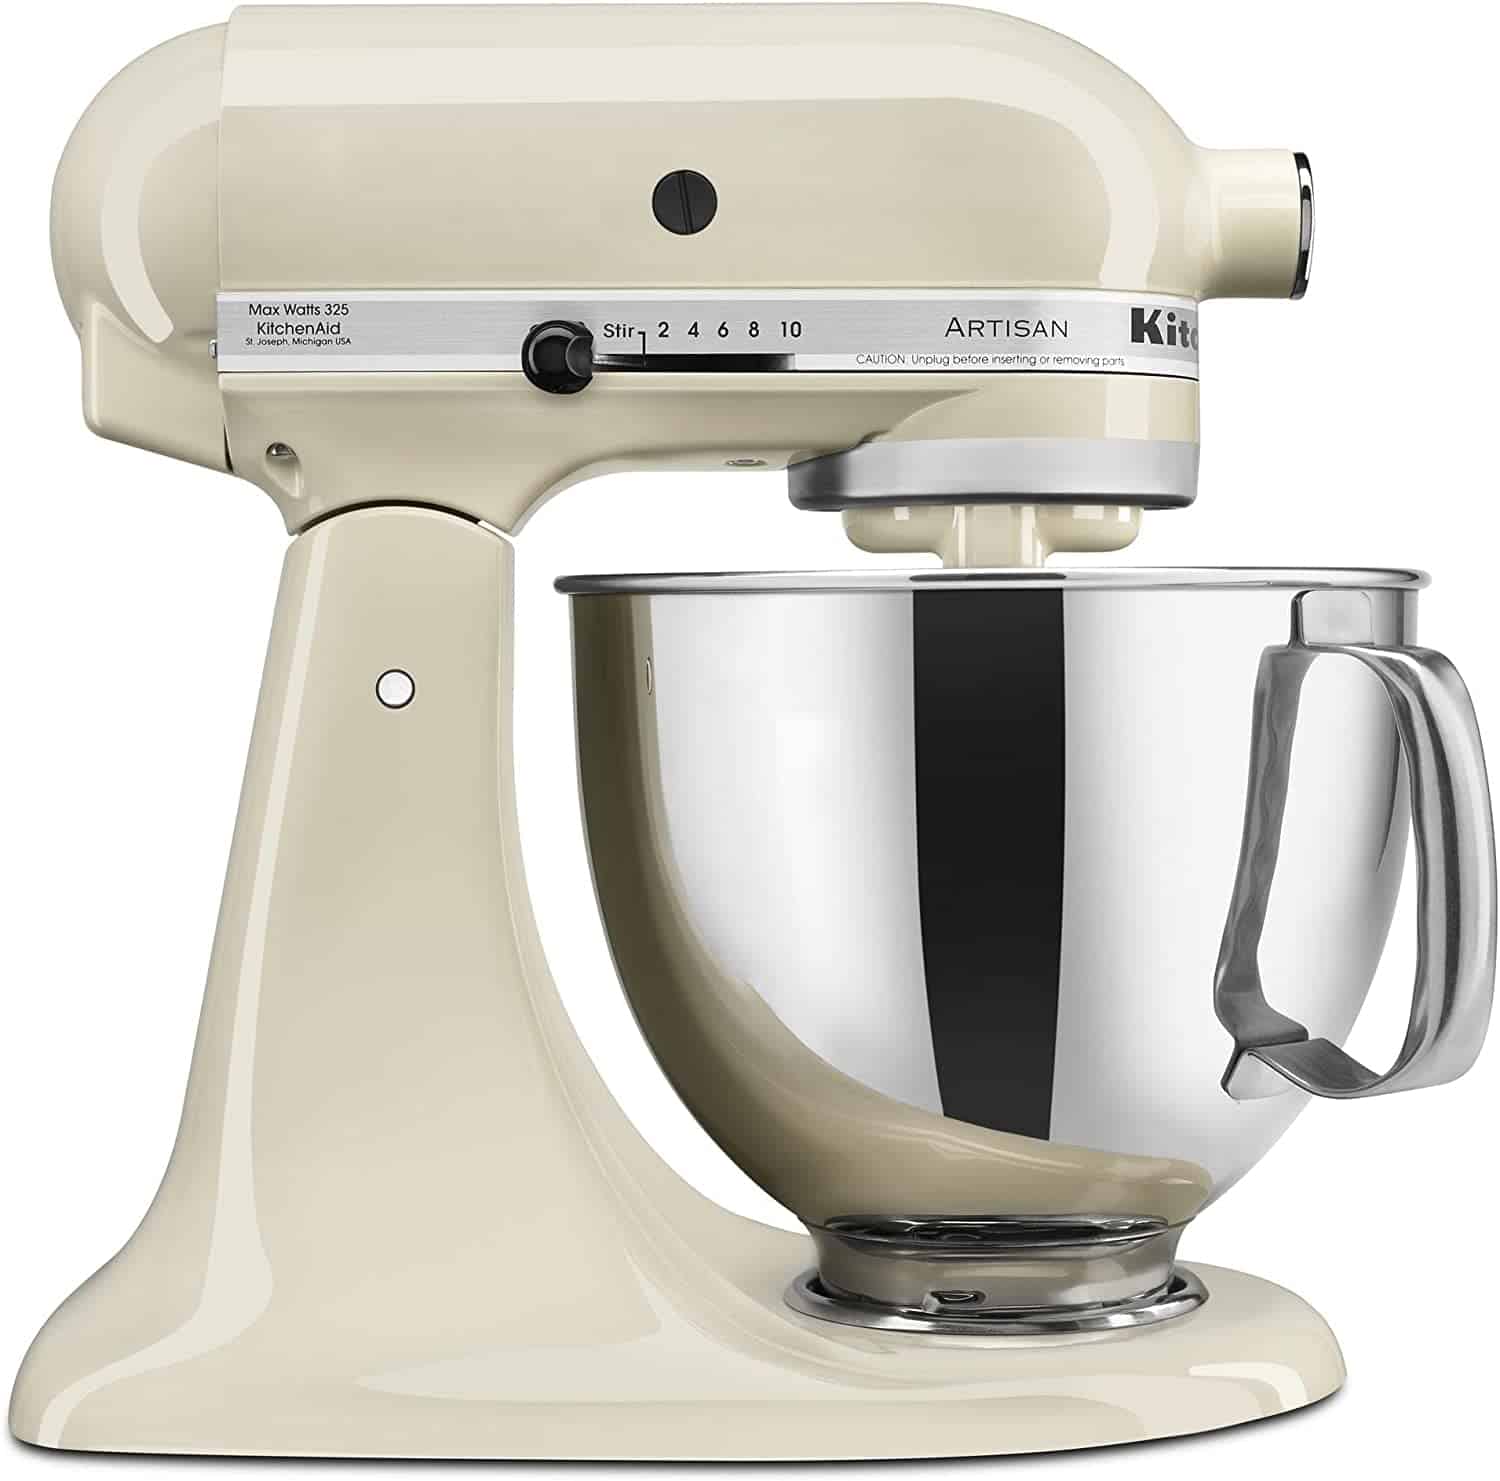
Kitchenaid Mixer with the paddle and dough hook attachment. I’ve had my Kitchenaid Mixer for twelve years. It is a powerhouse and suits this job perfectly! The dough hook on any electric mixer makes this job a lot less messy- I am all about the quick cleanup!
♥Thanks for supporting me! Sharing, commenting, and reviewing all help to spread the word about Modern Harvest and help to grow the site! As an Amazon Associate I earn from qualifying purchases. I will never promote or link products that I don’t personally use or love. ♥
Tips + Tricks
- Don’t under-bake your Babka. Because of the pumpkin puree, it may look done before it is. Properly preheat your oven and bake for the full 30 minutes. If you are unsure whether or not your Babka is cooked, you can check the internal temp with a food thermometer. It should read 185° F.
- Take the Babka out of the pan as soon as you can after cooking and place on a cooling rack. Leaving the Babka in the pan can cause it to overcook and sweat. Not a good combination!
- If you are running out of time, you can shape the Babka, cover it, and leave it in the fridge overnight. Allow it to warm on the counter for an hour in the morning and cook as usual!
- You can freeze your Chocolate Pumpkin Babka! Make several at once and freeze them to impress your guests at a later date. Either vacuum seal or wrap tightly in plastic wrap and place in a zippered bag or airtight container. It is best if eaten within 6-8 weeks…but who are we kidding?! It won’t last long after you get a good taste of it.
- Your oven might have a proofing setting which will help to rise your dough nicely! I’ve always plopped my dough in the microwave with the door mostly shut… just open enough to keep the light on and the microwave warm.
- Make sure that your yeast is not expired!! I have ruined a few loaves of bread trying to save a trip to the grocery store and using slightly expired yeast. Err on the side of caution and get some fresh yeast for this recipe!
You Can Do It! Schedule Your Bake
As with other traditional breads, there is a lot of down time in between steps for all babka recipes – clean up, read a book, run some errands… embrace the process and rising time!
9am Proof the Yeast
9:15 Add additional ingredients and prepare the rest of the dough. Allow the dough to rise for two hours.
11:30 Roll into a 12×20 inch rectangle. Refrigerate for an hour. Make the filling.
12:35 Spread the filling, roll the dough into a log. Slice lengthwise and twist. Place in pan for another hour to rise.
1:45 Stow the risen Babka in 375°F oven and bake for 30 minutes. Make the glaze.
2:15 Immediately remove the Babka from your pan and place on cooling rack. Brush on the glaze.
2:30 Brew a cup of coffee and enjoy the fruits of your labor!
How to Make a Chocolate Pumpkin Babka
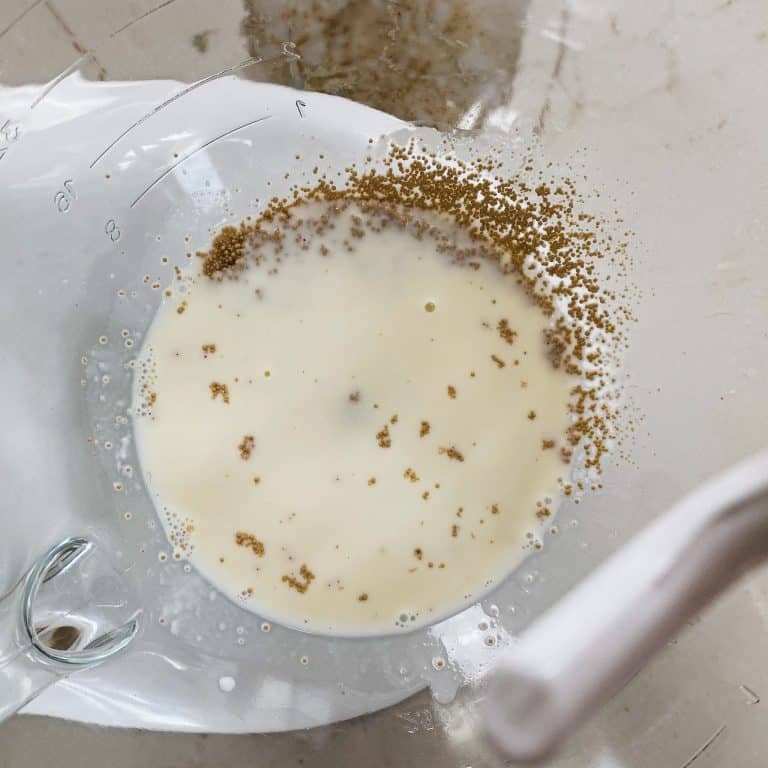
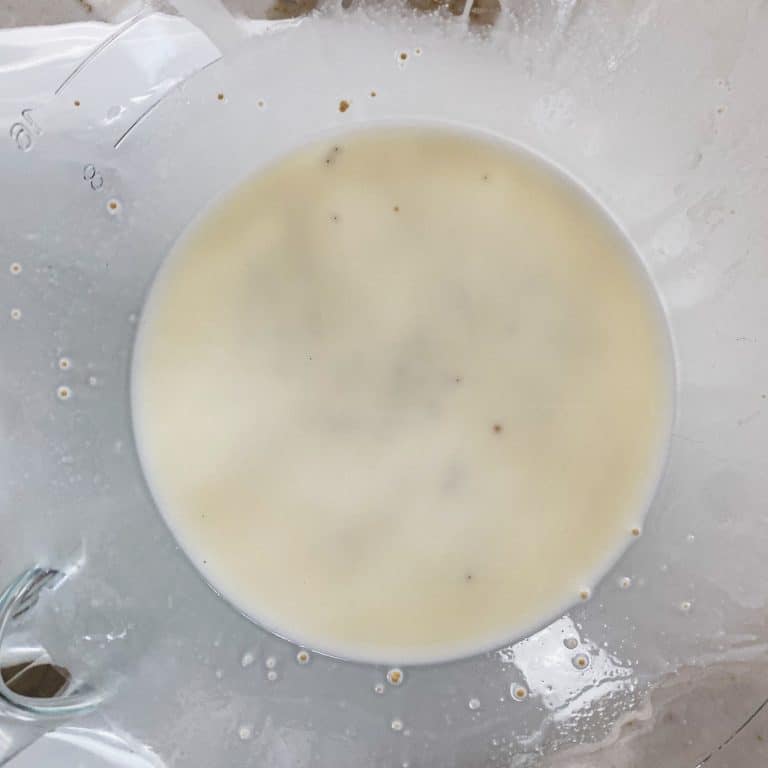
Proof the yeast. Combine the yeast, sugar, and warm milk in the bowl of your stand mixer and allow it to proof for 10 minutes; until you notice it is foamy.
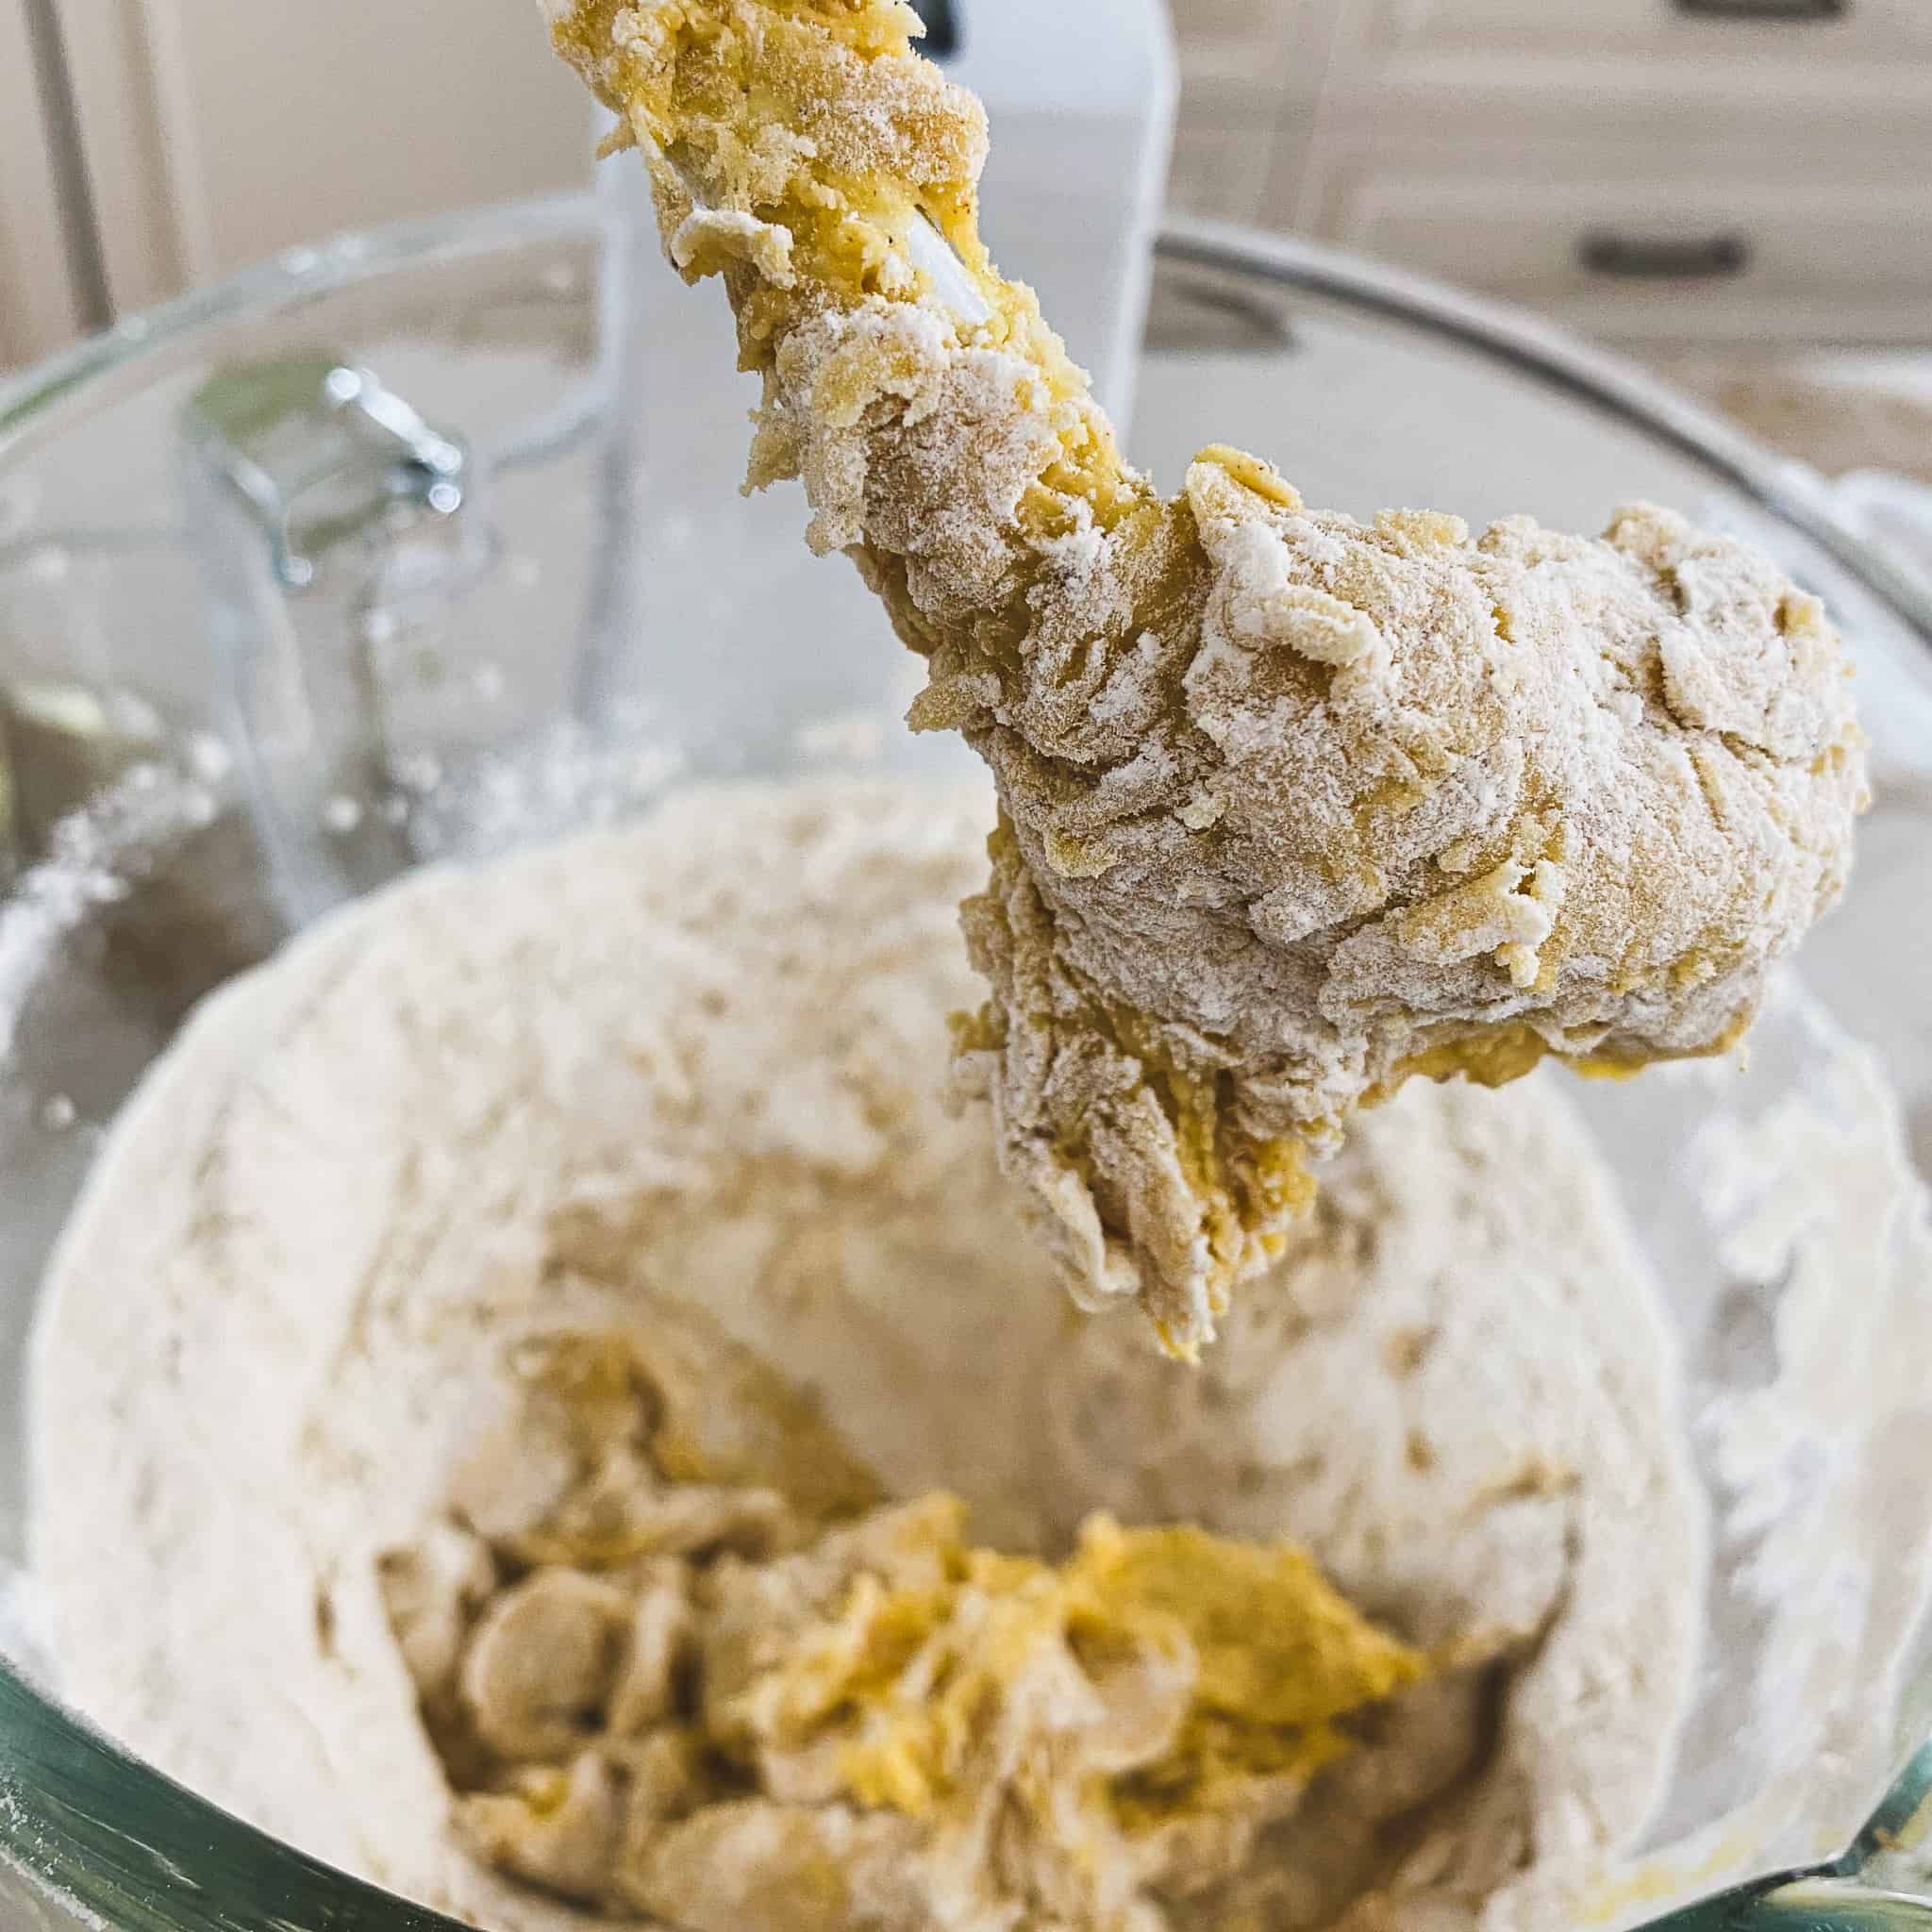
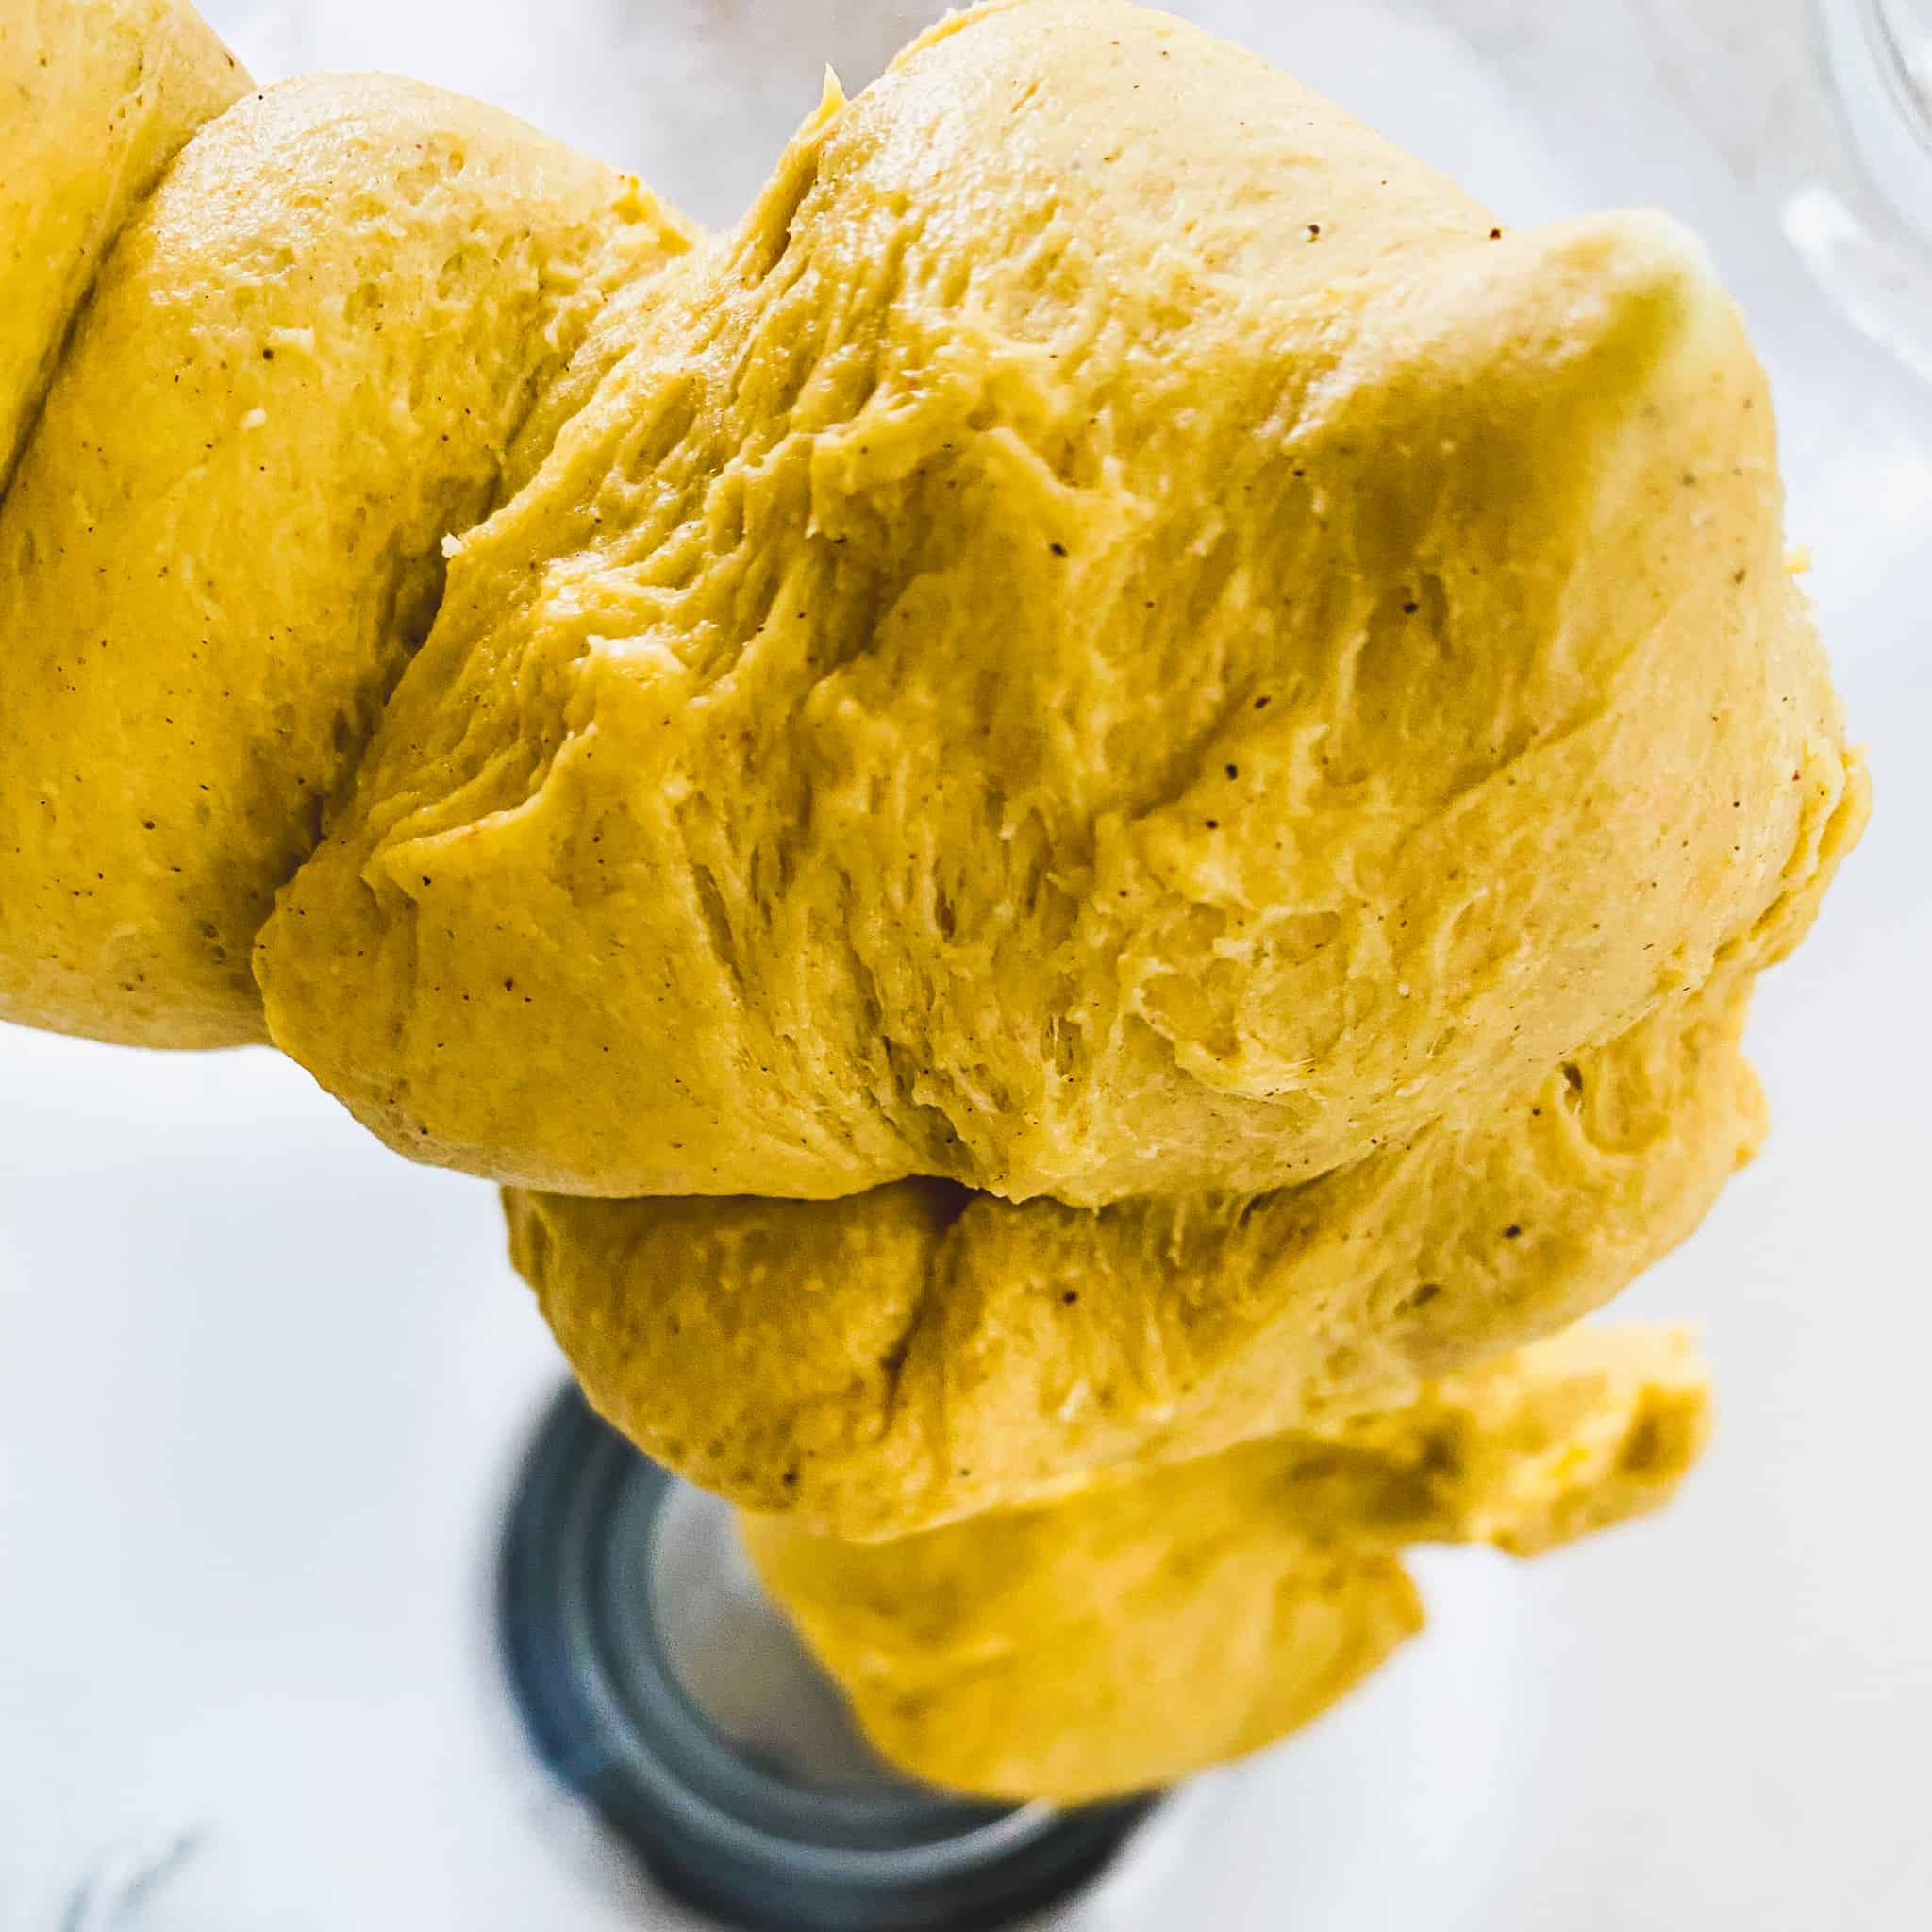
Prepare the dough. Using the paddle attachment, add in butter, salt, pumpkin puree, egg, sugar, and spices with the yeast mixture and mix well on a medium-low speed. The butter will likely be slightly lumpy in the dough at this point. Switch to the dough hook attachment installed and slowly add flour. Mix the dough on the lowest setting for about five minutes. It should be pulling away from the sides of the bowl and you should have a smooth, elastic ball by the end of the five minutes. Depending on the day, you may have to add up to half of a cup of flour in order to make sure that the dough is pulling away from the edge of your bowl. Start off by adding small amounts at a time- too much flour will result in a dense bread.

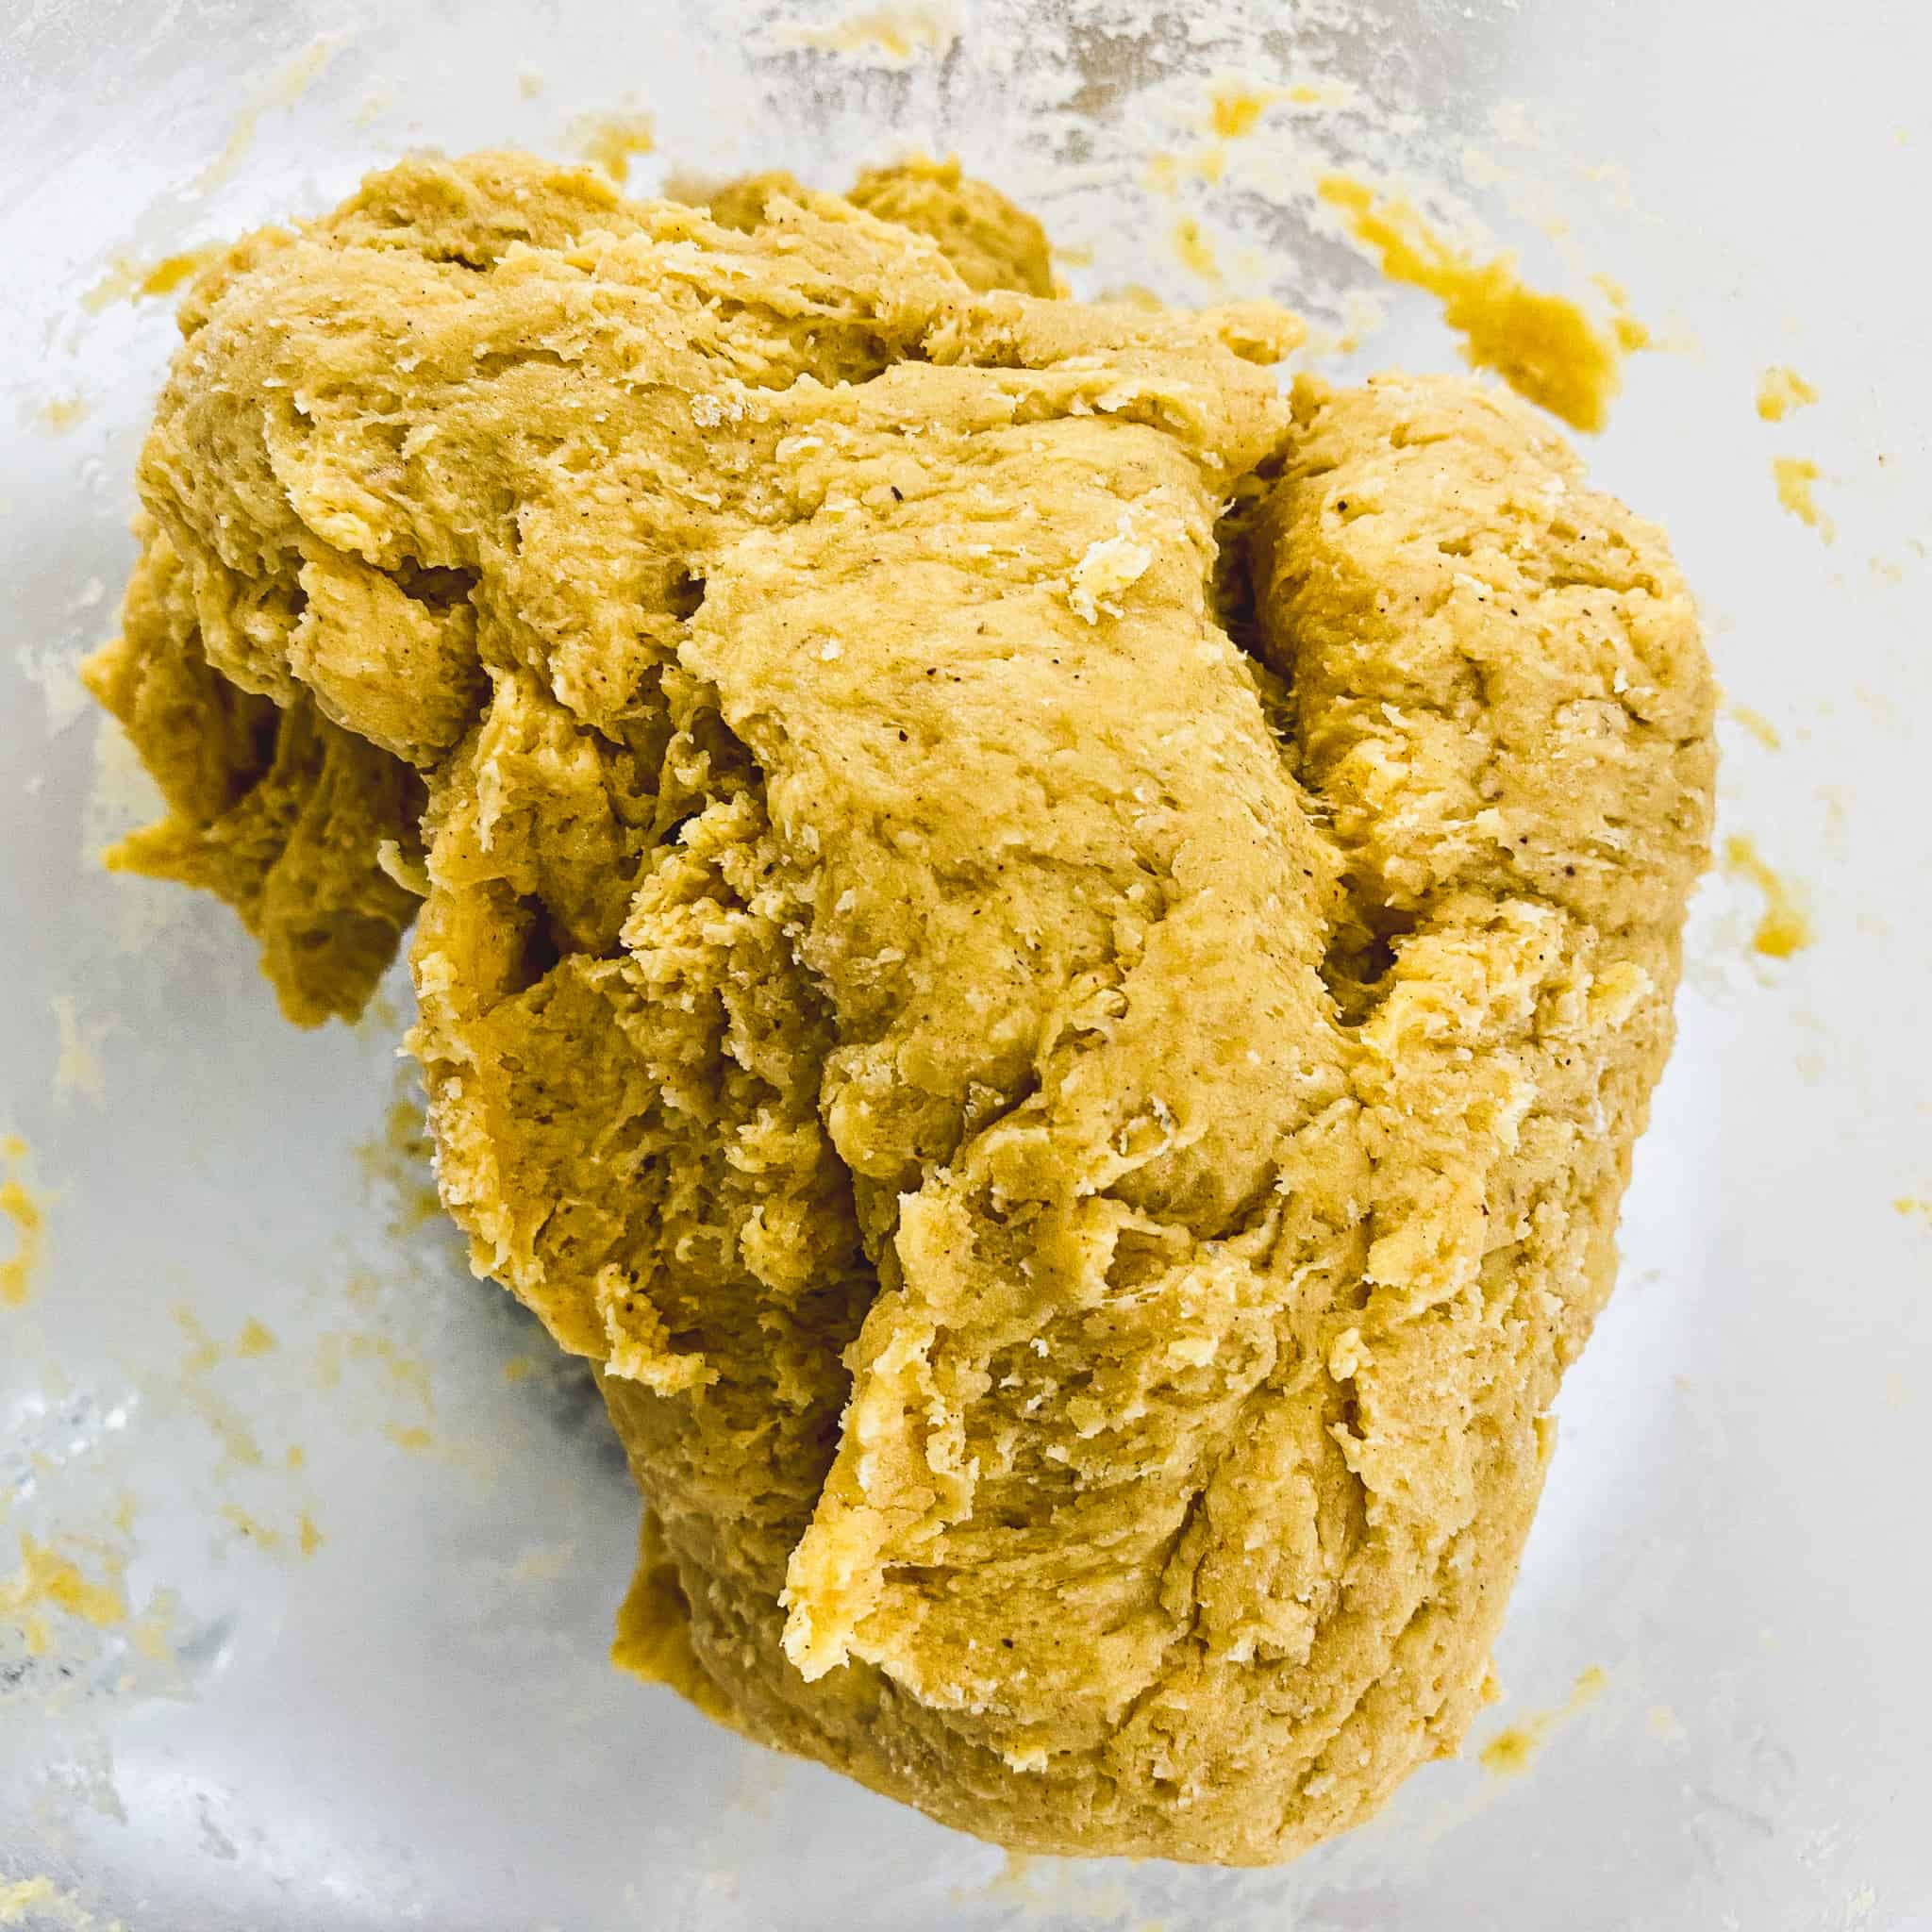
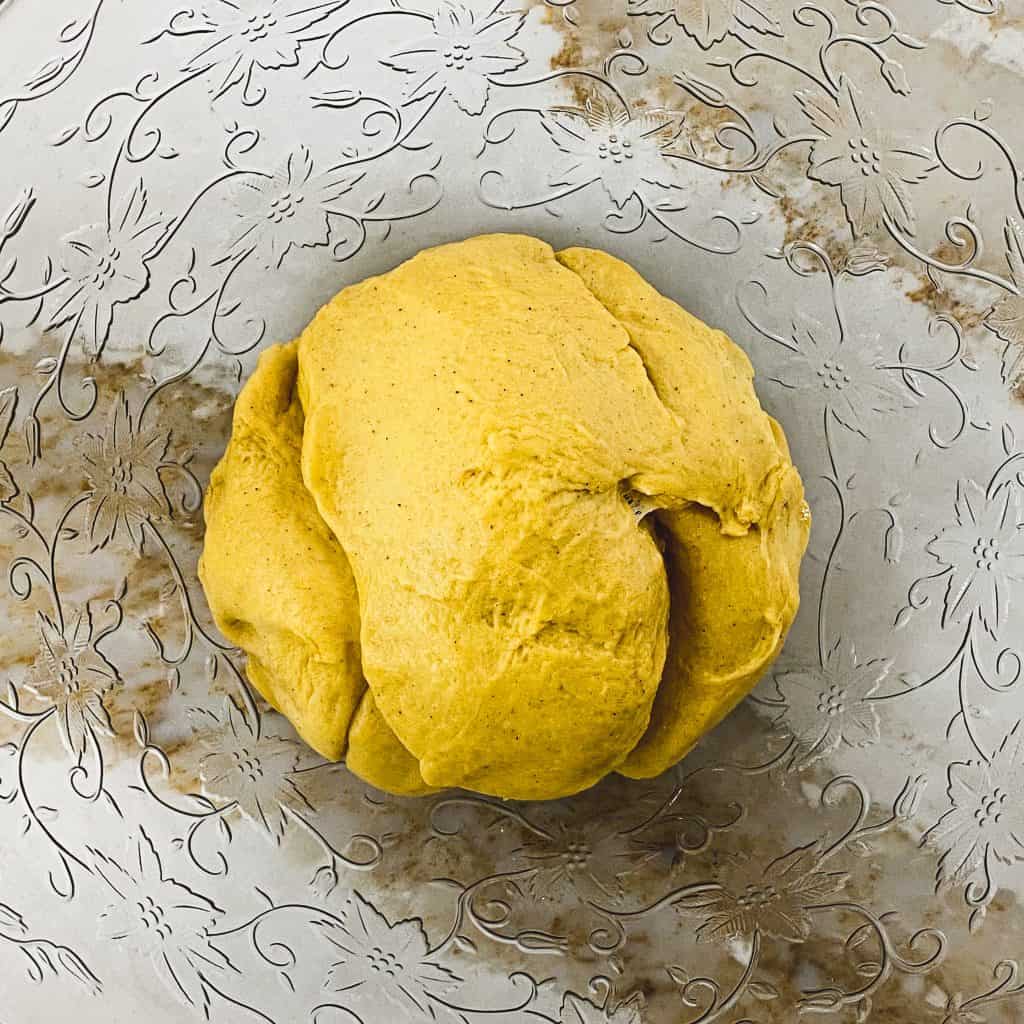
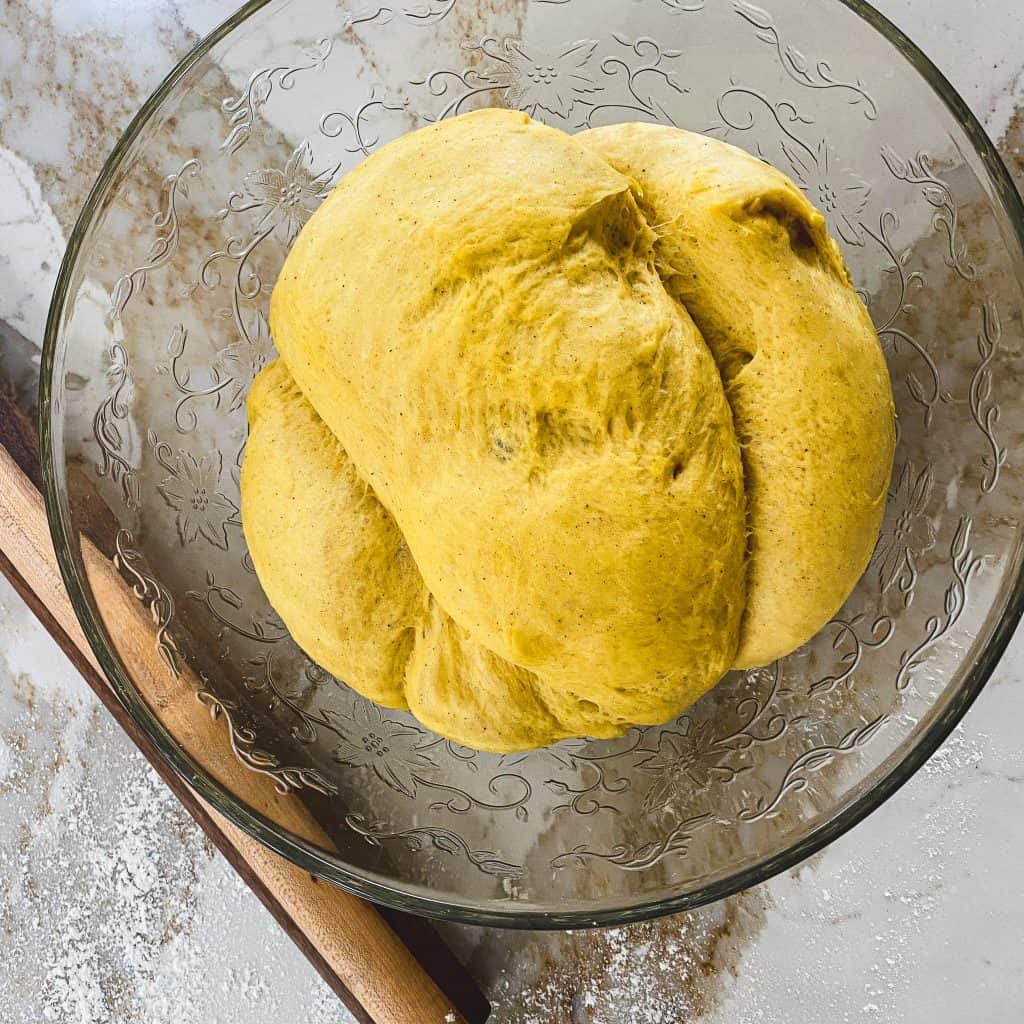
First rise. Place the dough in a clean, large bowl with a teaspoon of vegetable oil at the bottom. Cover it with a tea towel and allow it to rise in a warm place for two hours. Your dough should double in size.
Roll it out. On a lightly floured surface, roll the dough into a rectangle that is approximately 12×20 inches. Gently fold it and transfer to a cookie sheet. Unfold and manipulate the dough to perfect its rectangular shape and size.
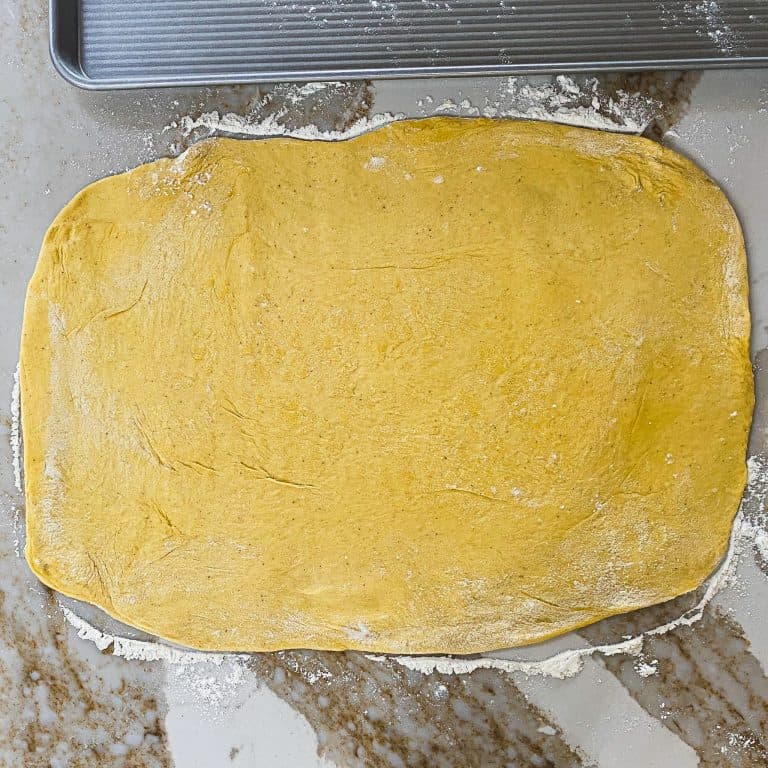
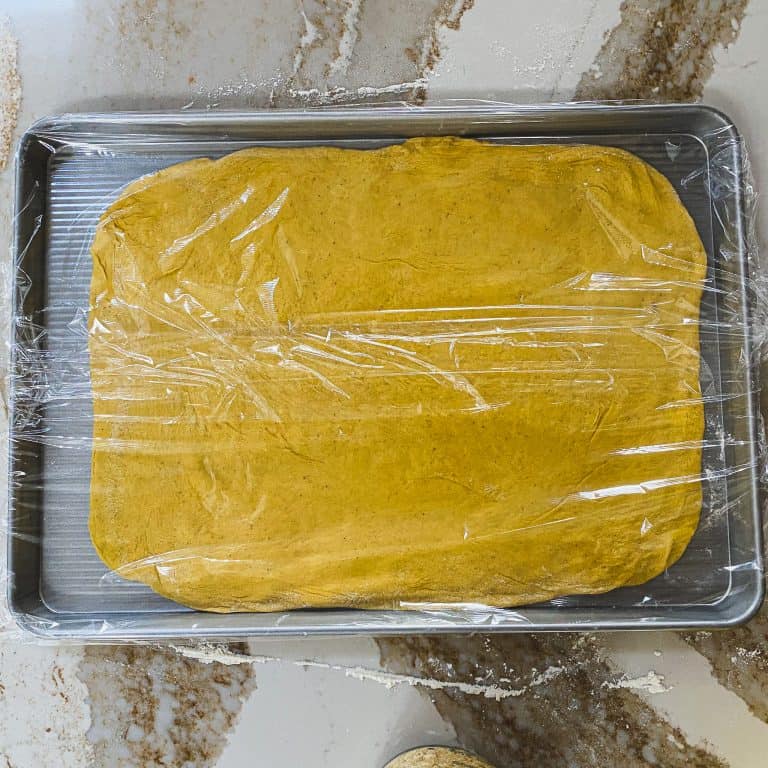
Chill. Cover the dough with plastic wrap and place it in the fridge for an hour to cool it off. This step allows you to spread the filling over it easier, minimizing dough stretching and tearing.
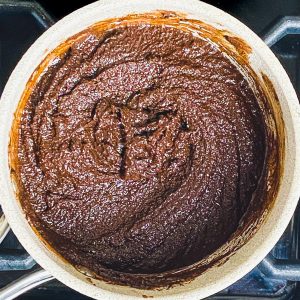
Prepare the filling. While the dough is chilling, prepare the filling. In a small sauce pan, melt the butter. Add sugar, chocolate, and coco powder and mix until combined.

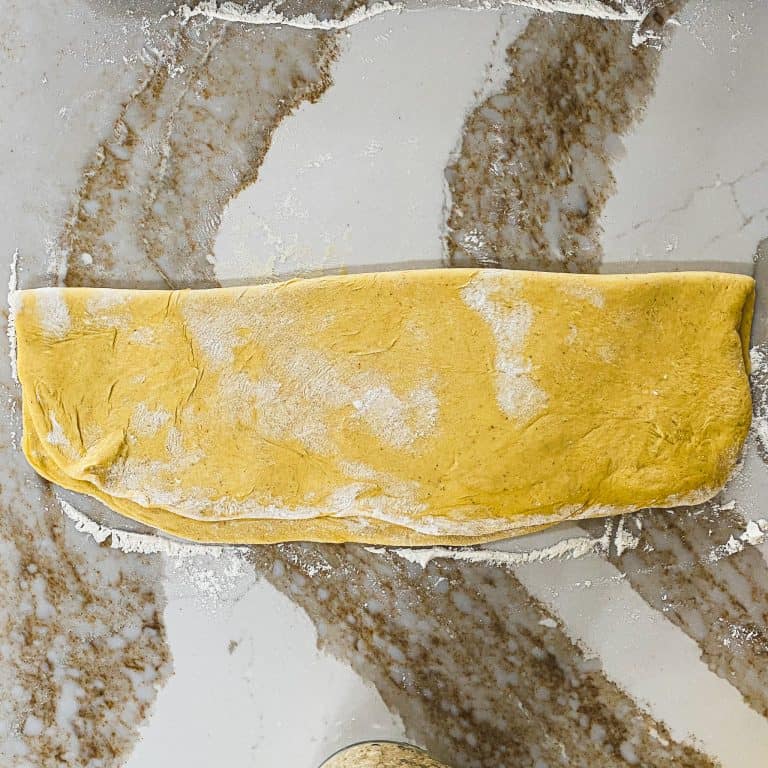
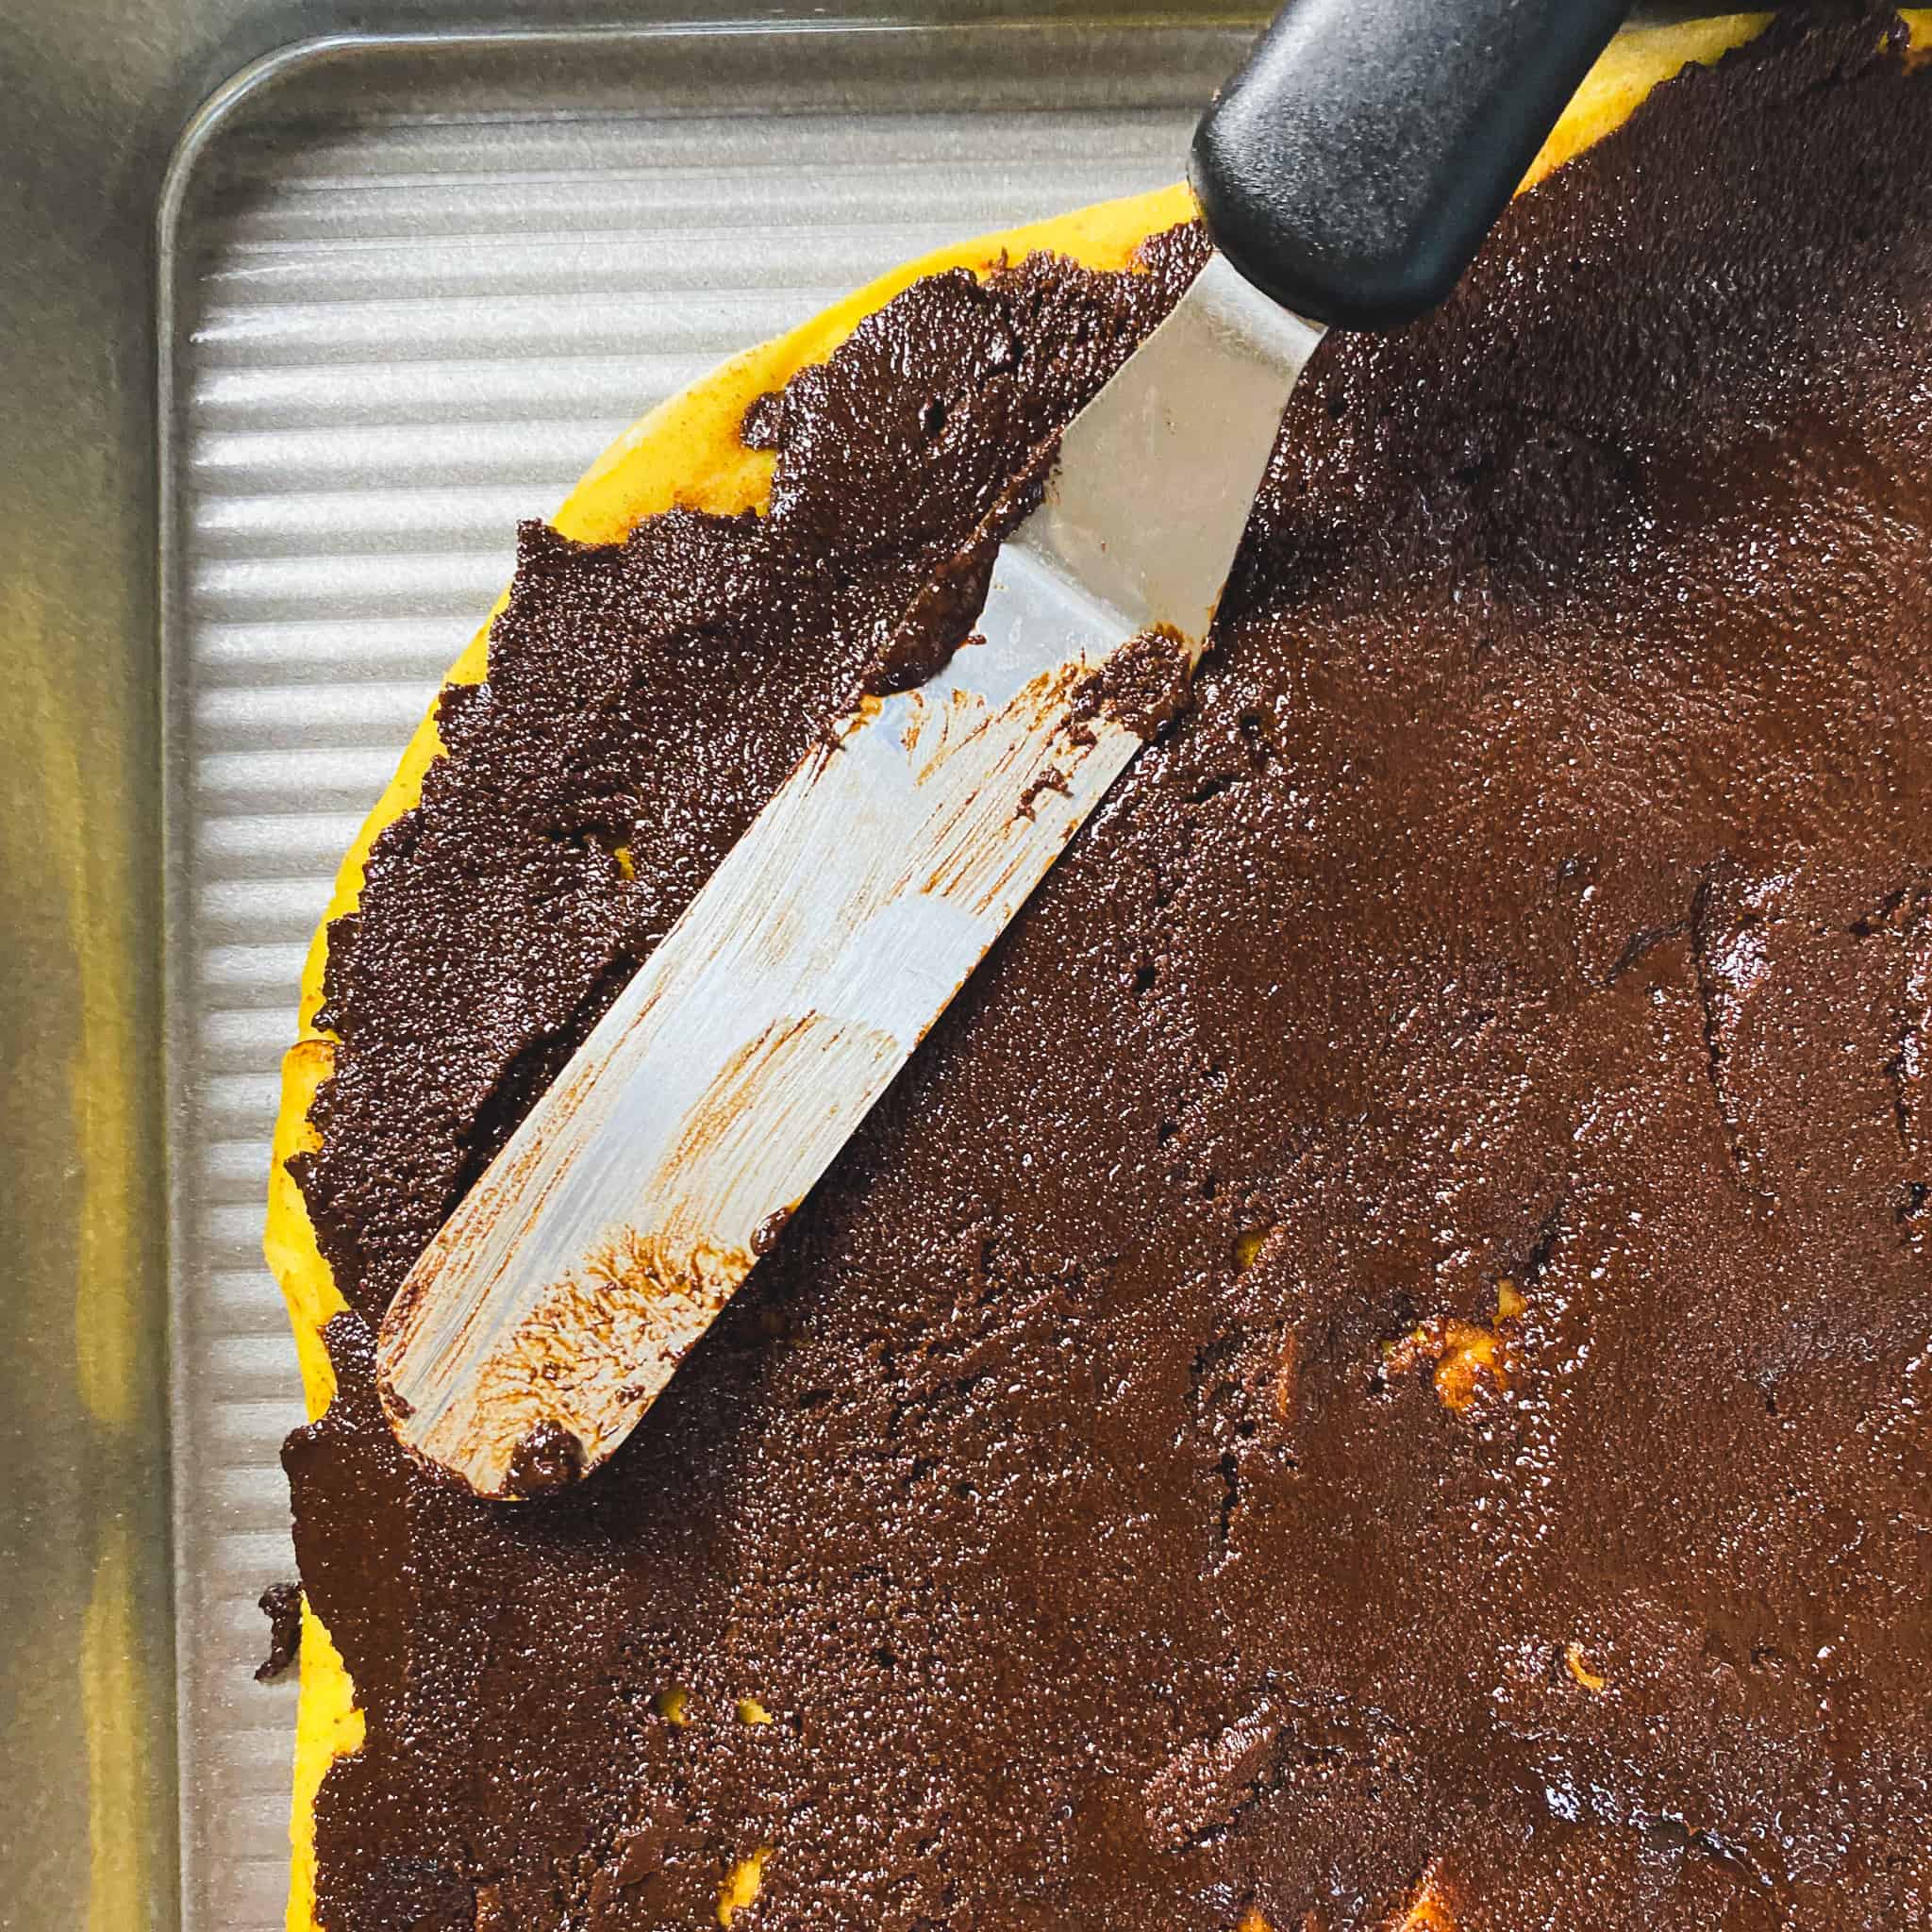
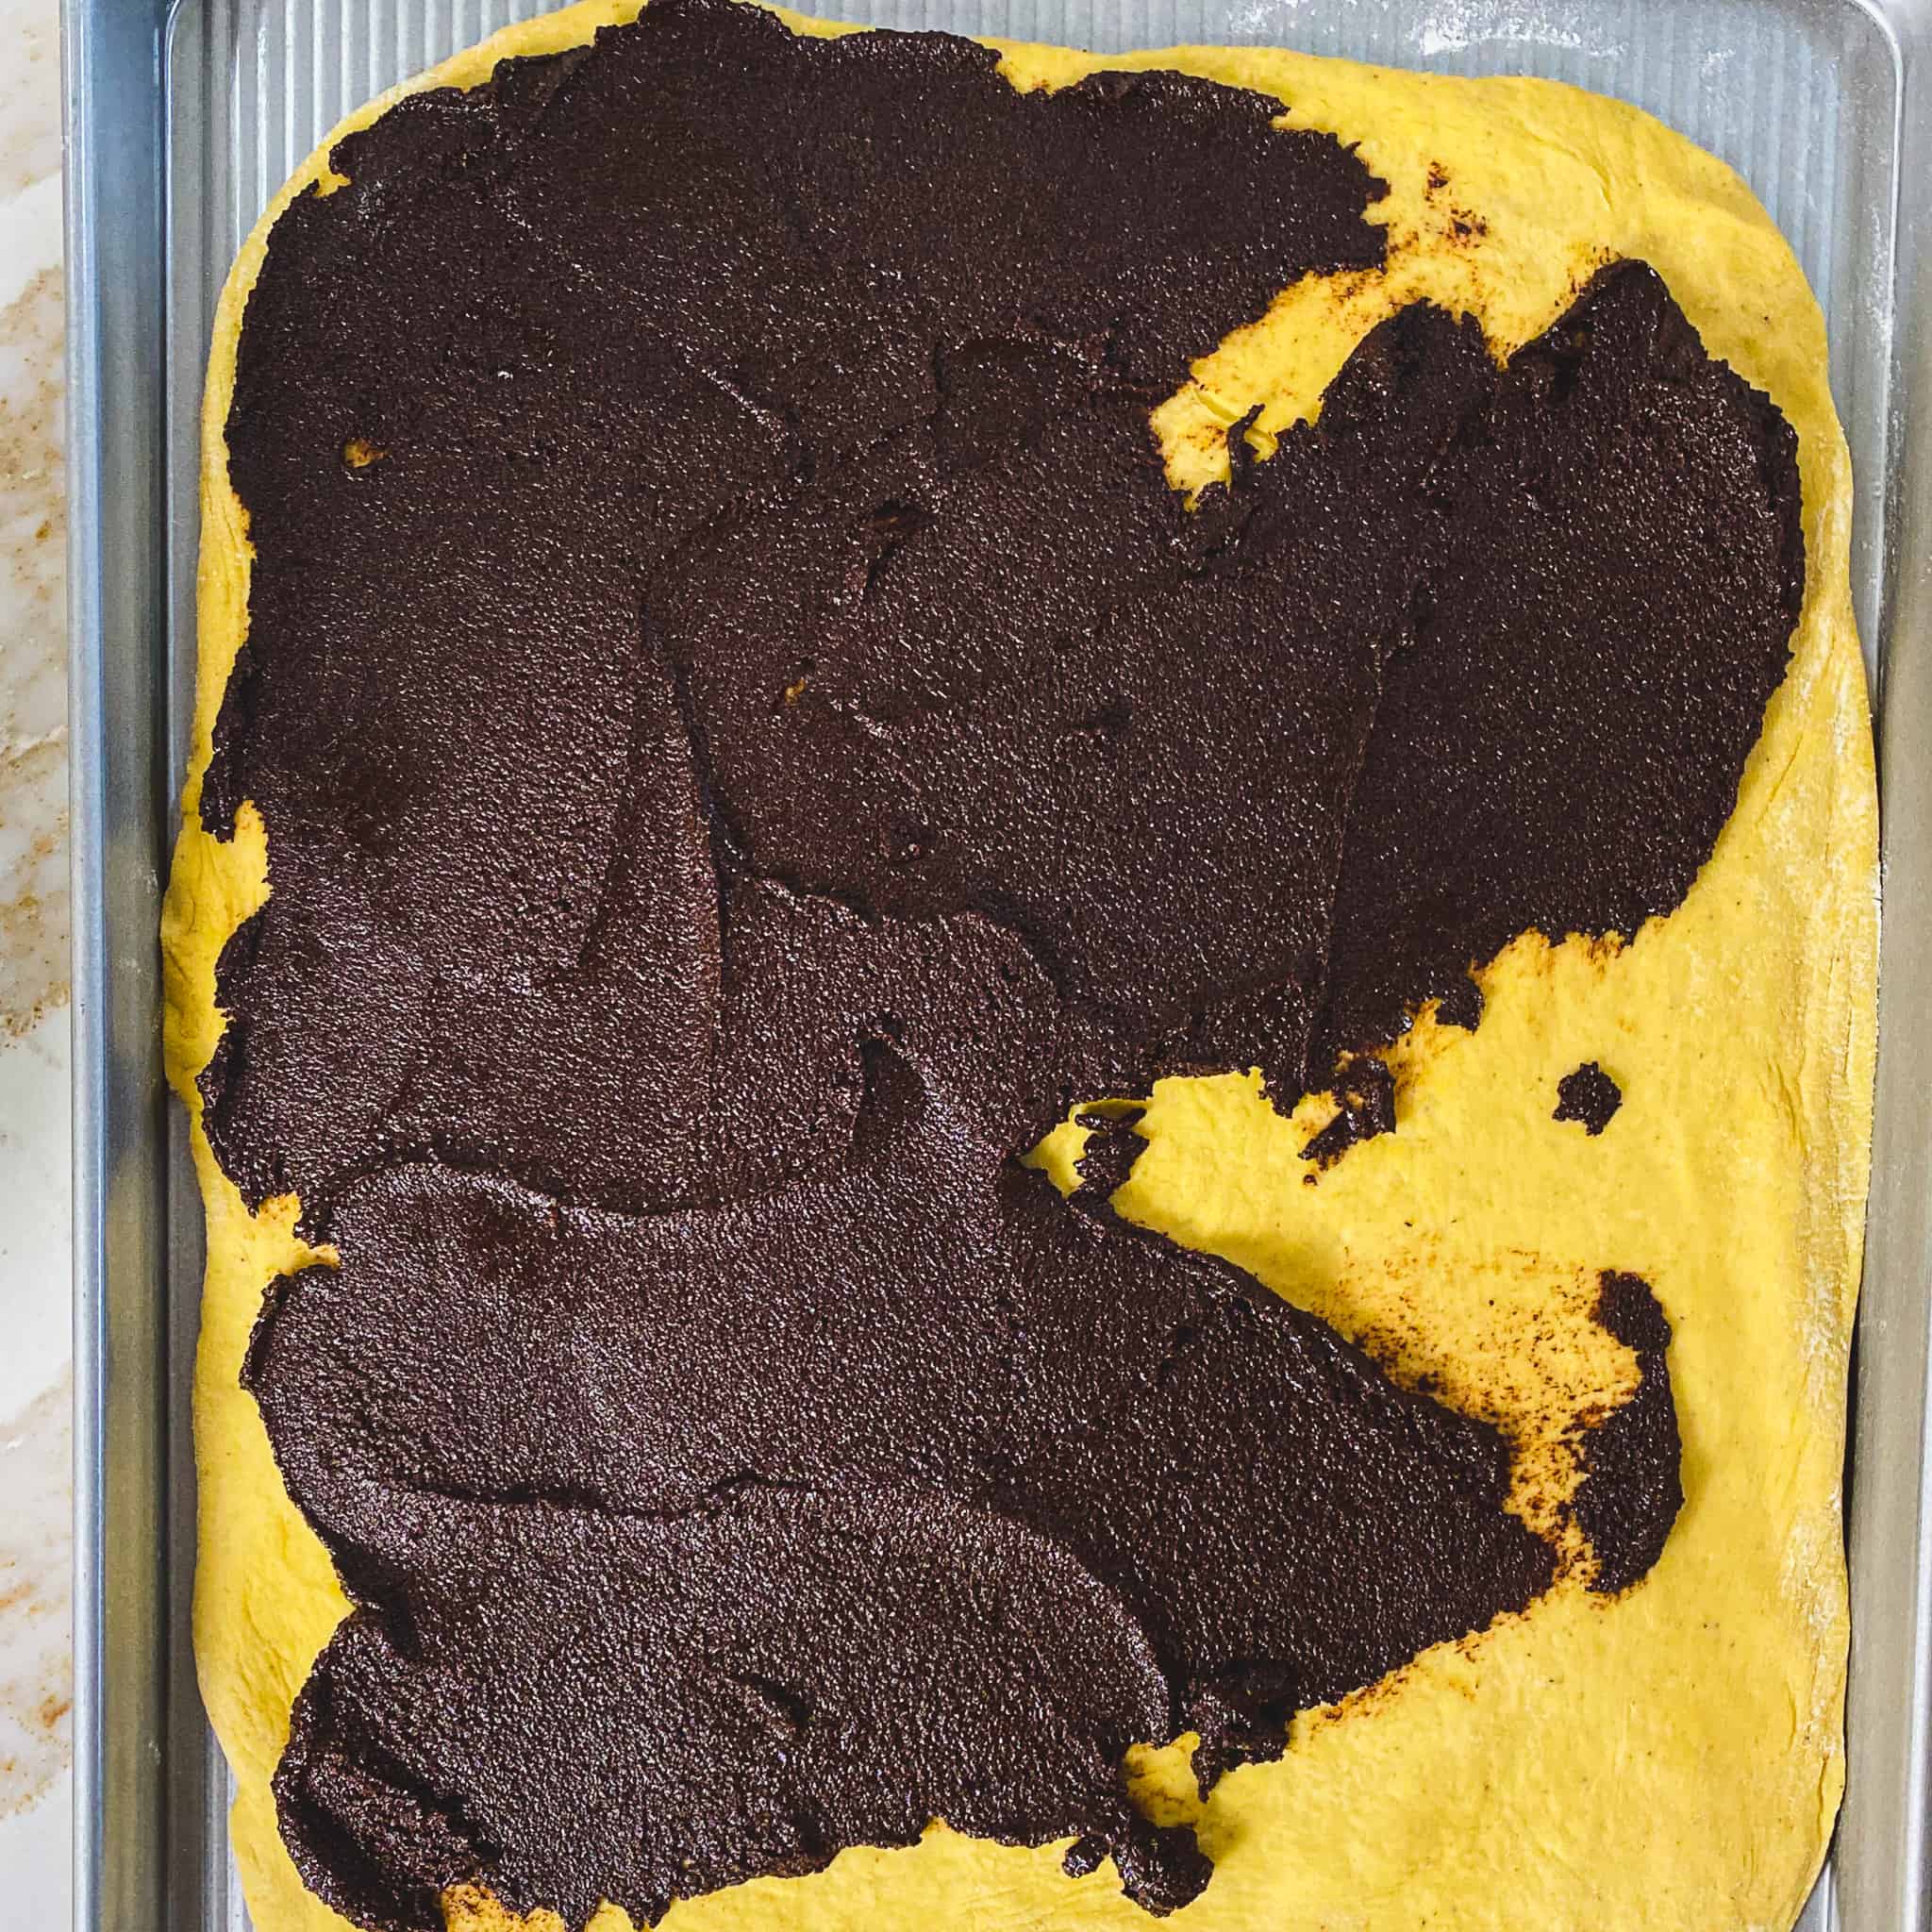
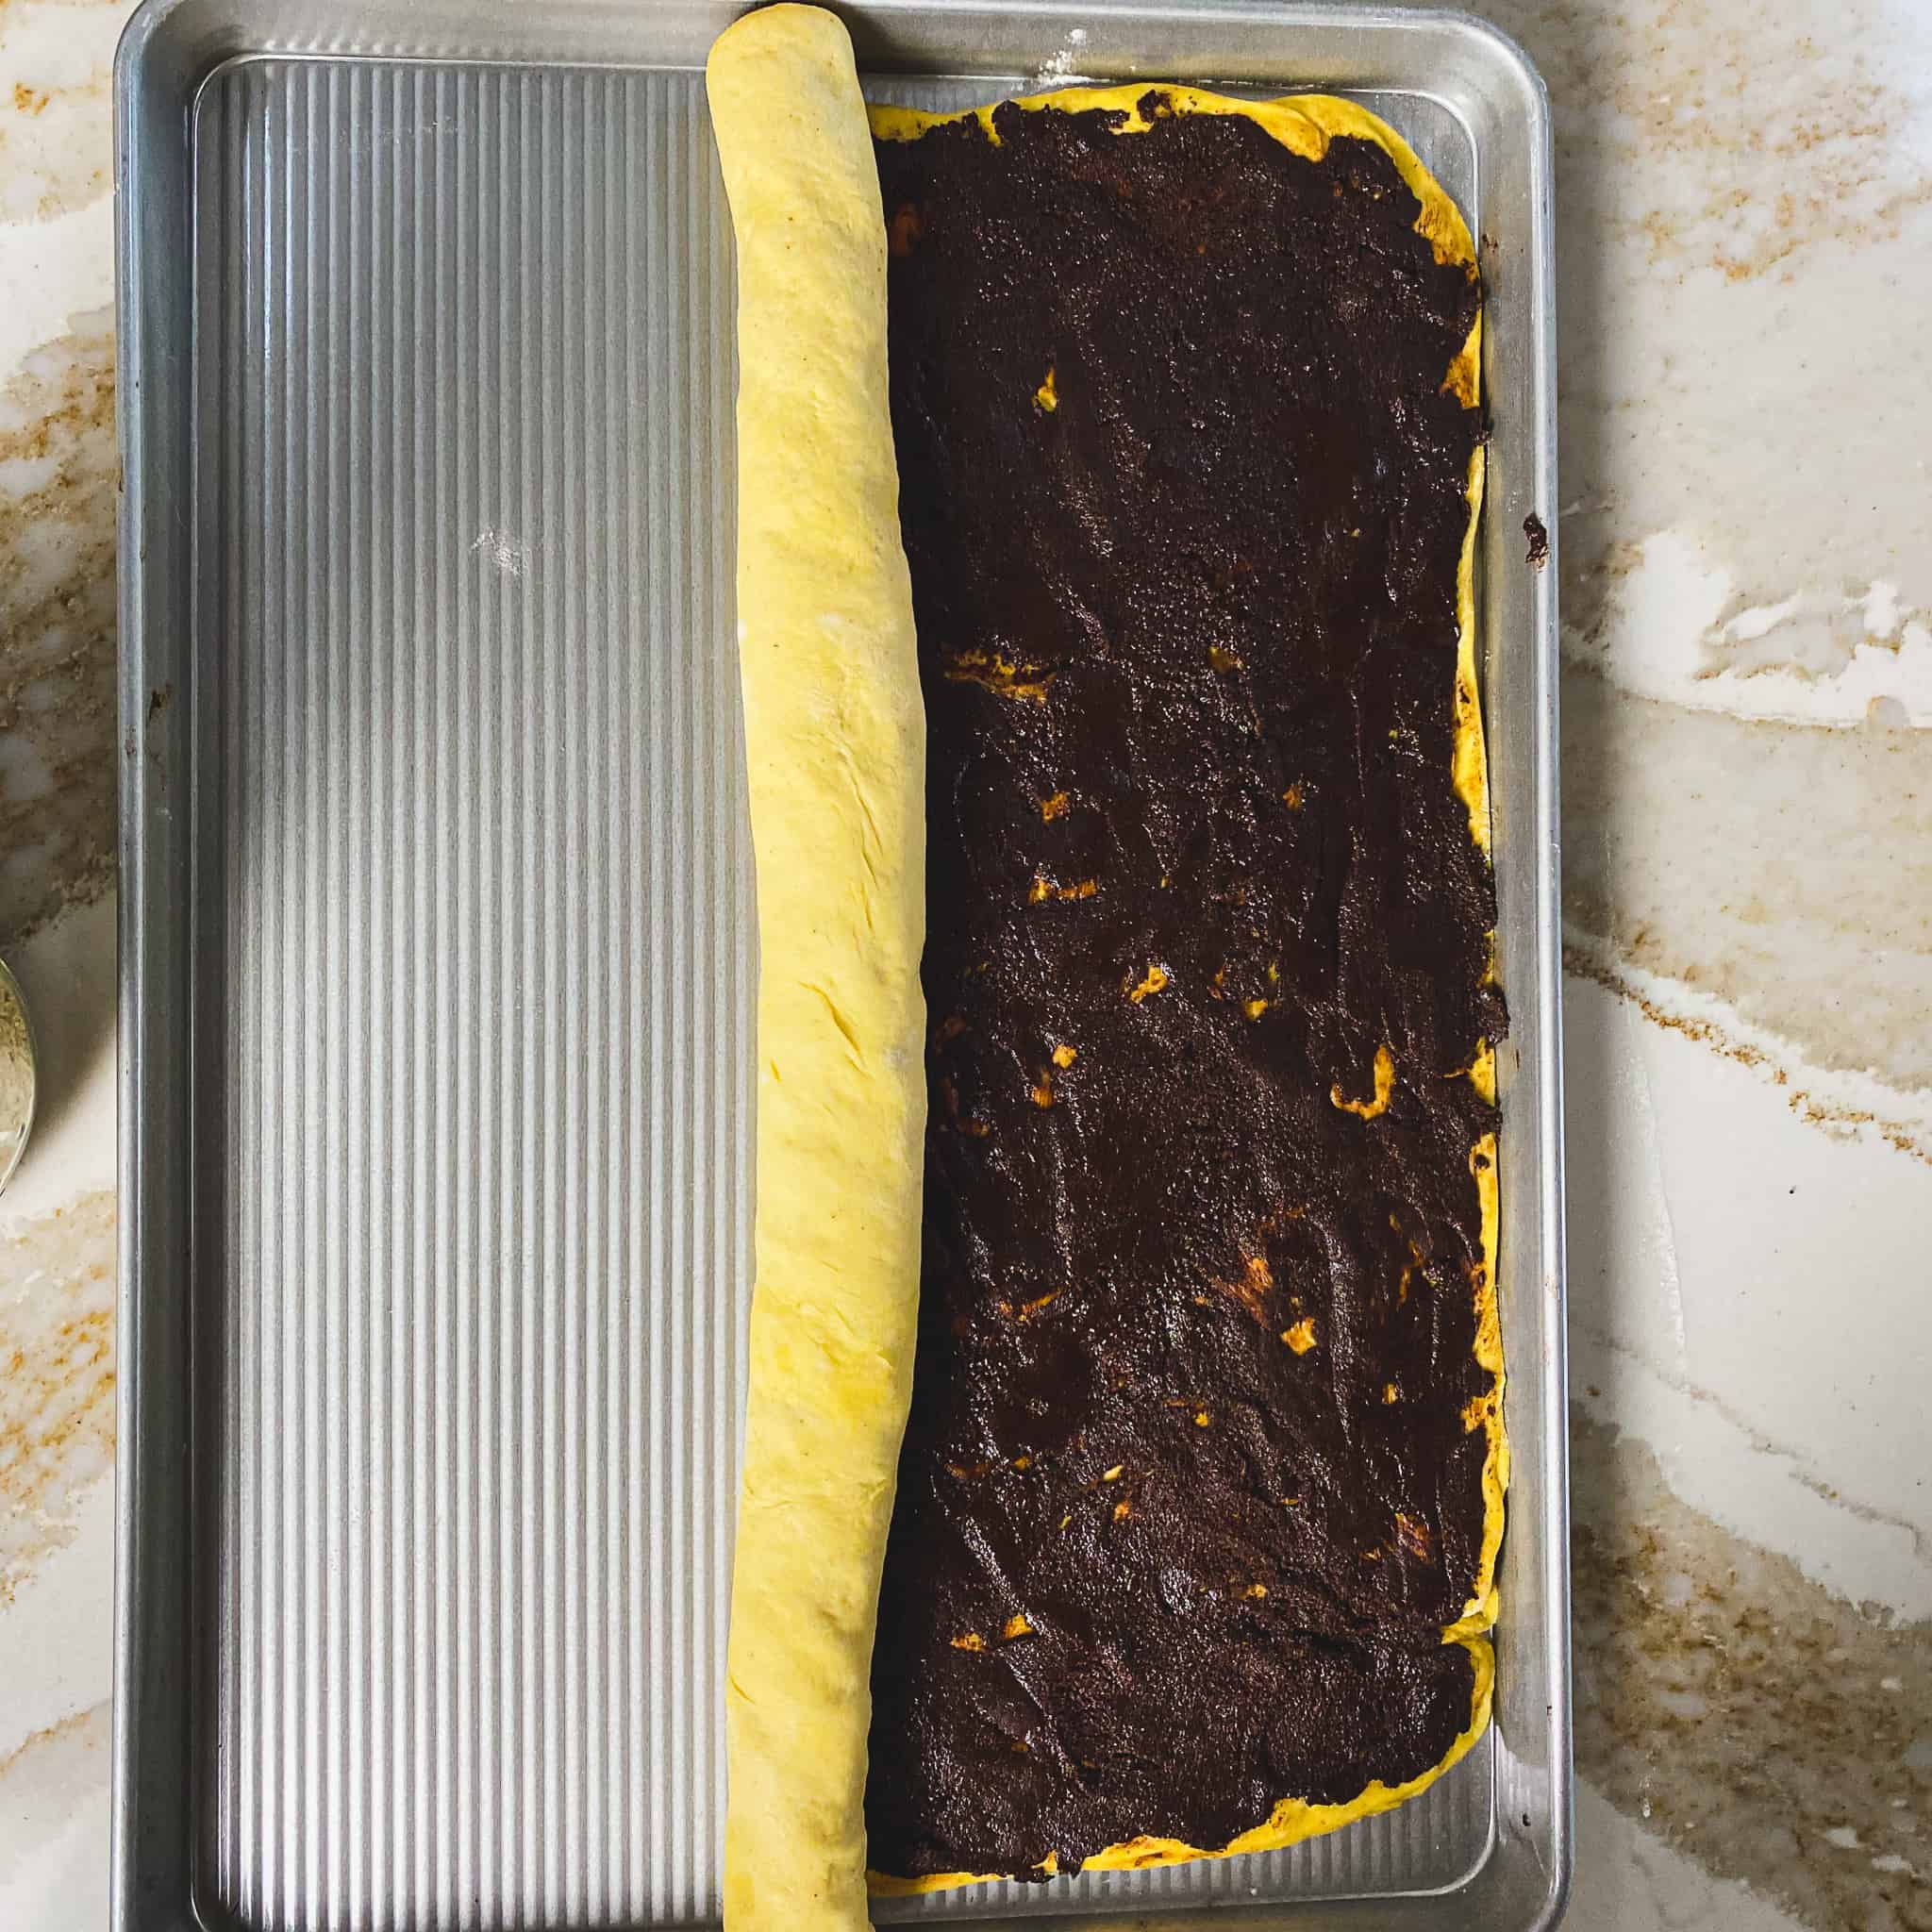
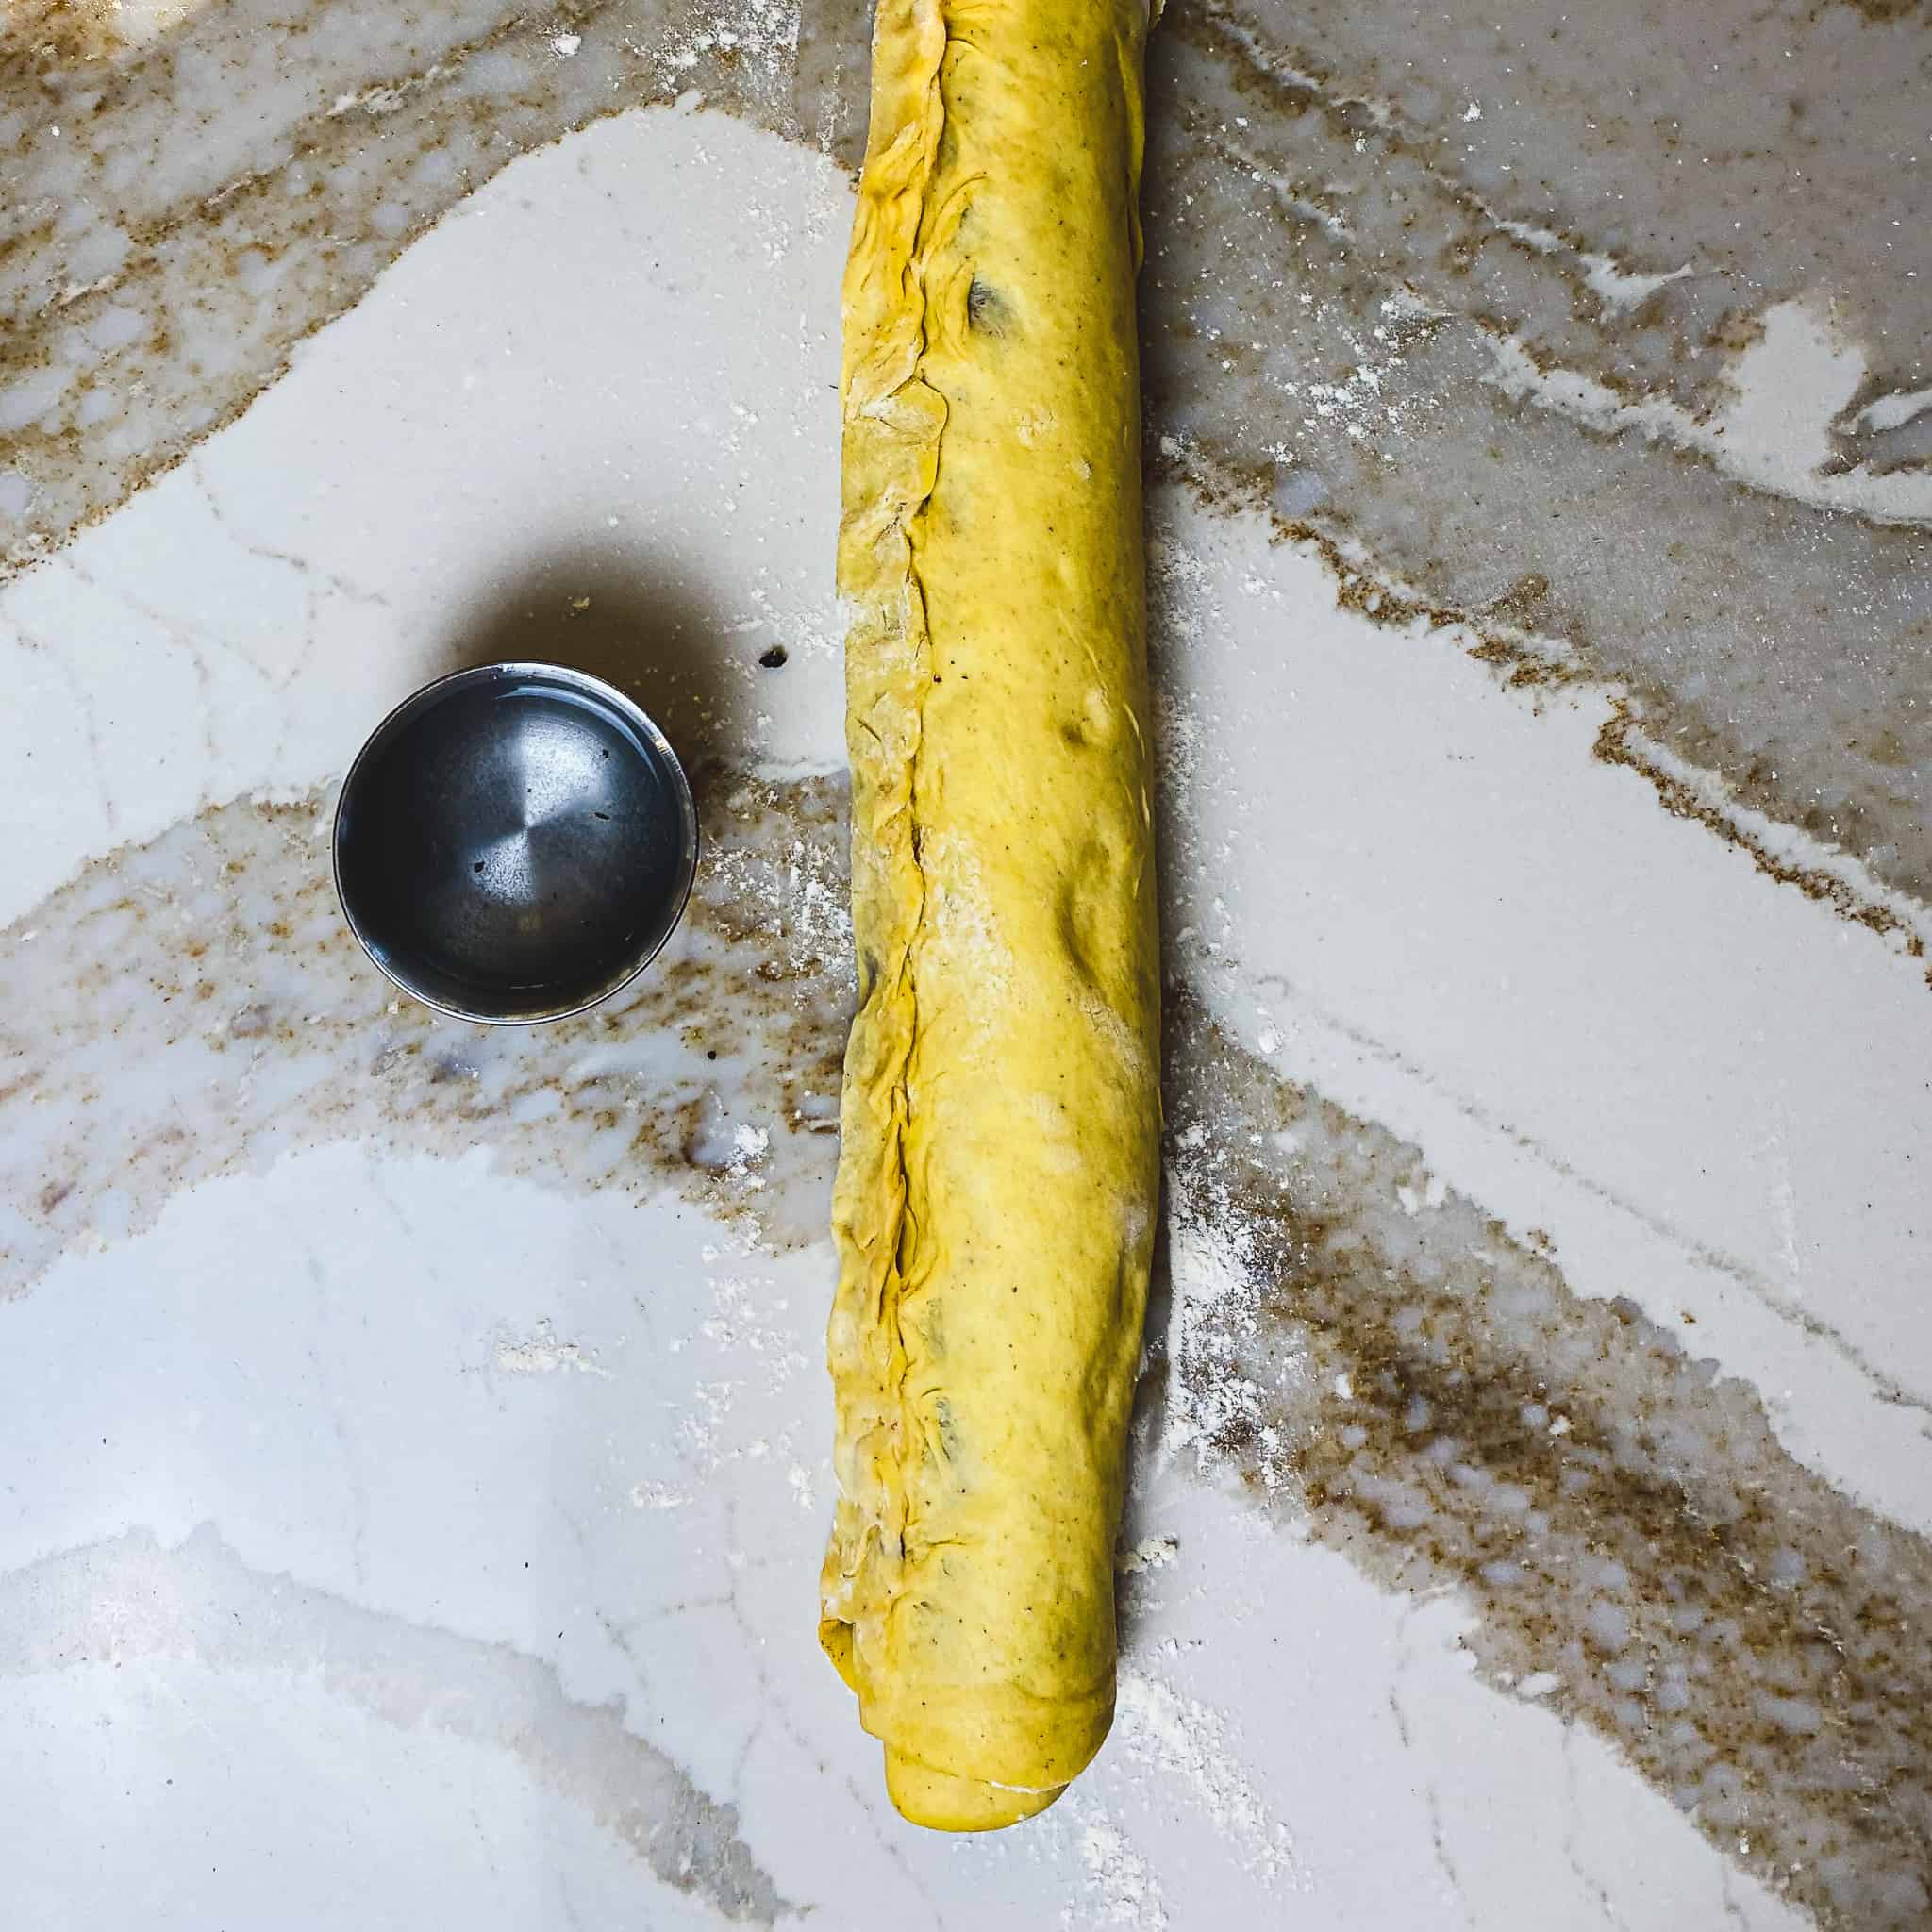
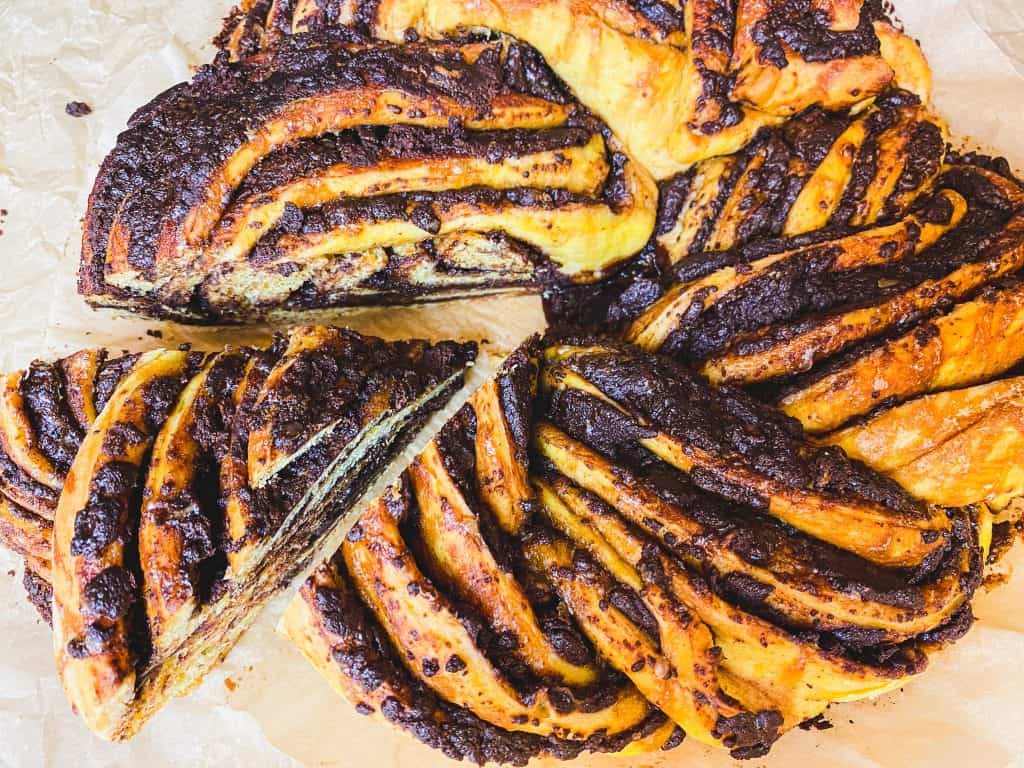
Make the roll. Once cooled, take the filling and spread it over the dough. Be sure to get filling right to the edge to make sure that every bite is filled with chocolatey goodness. Roll the rectangle up on the long edge. Using your finger or a pastry brush, paint a small amount of water along the seam of the roll to make sure that it doesn’t unravel on you. Pinch the seams shut.
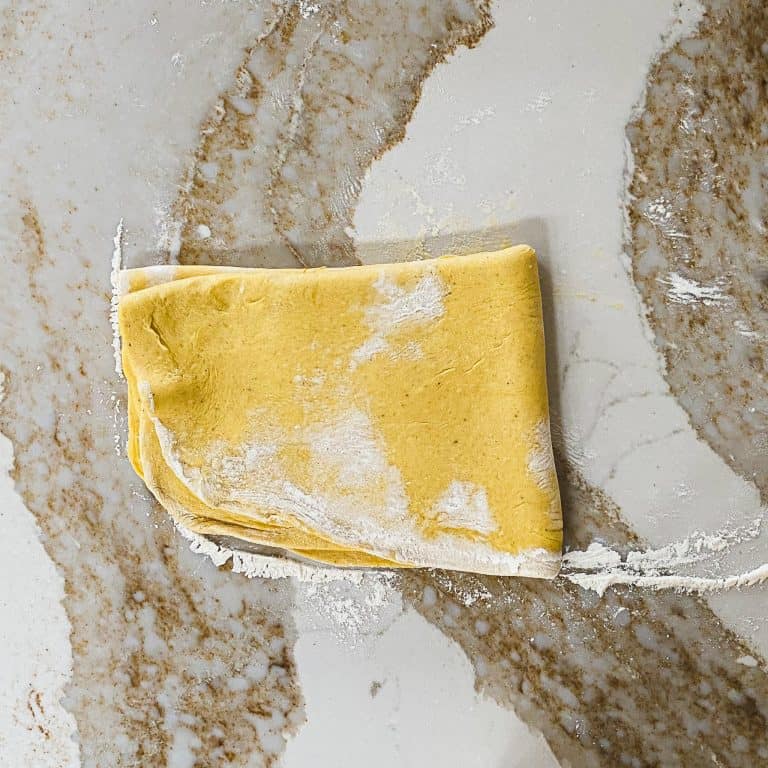
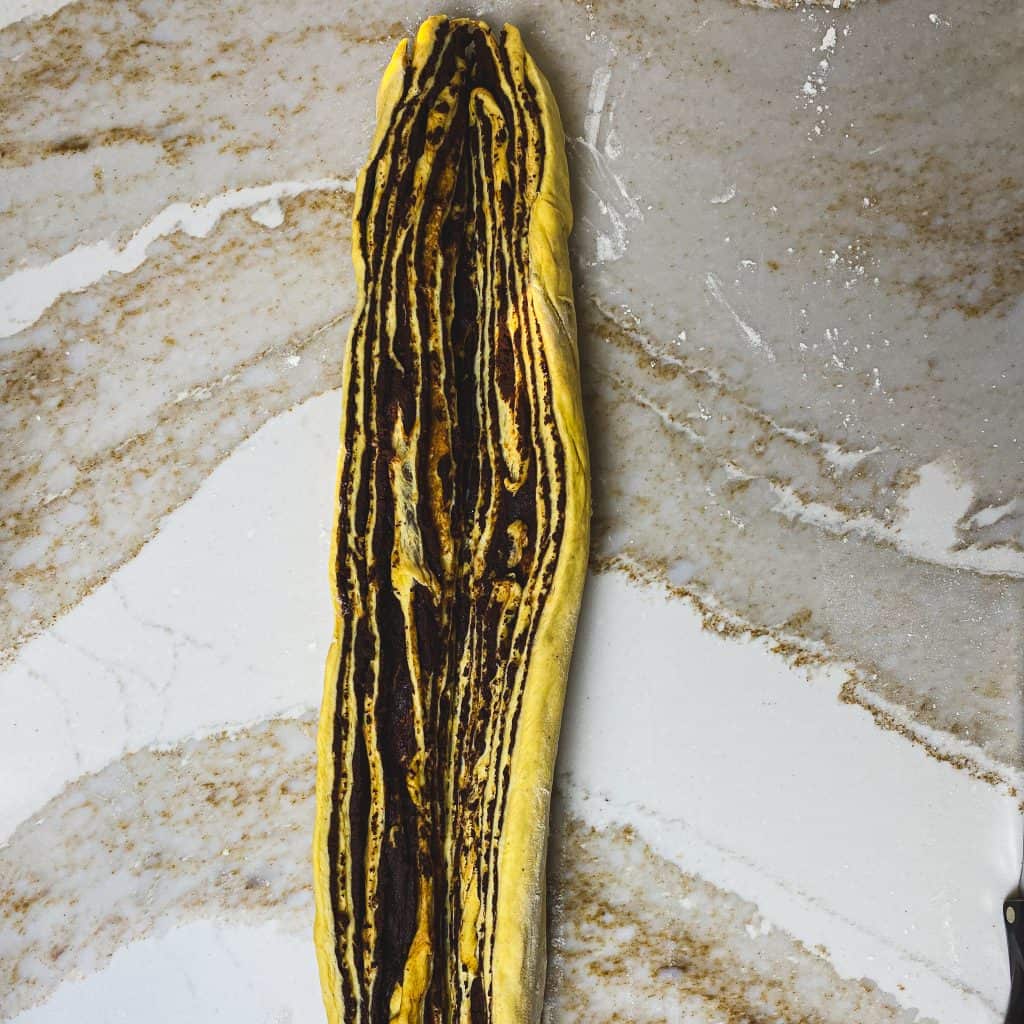
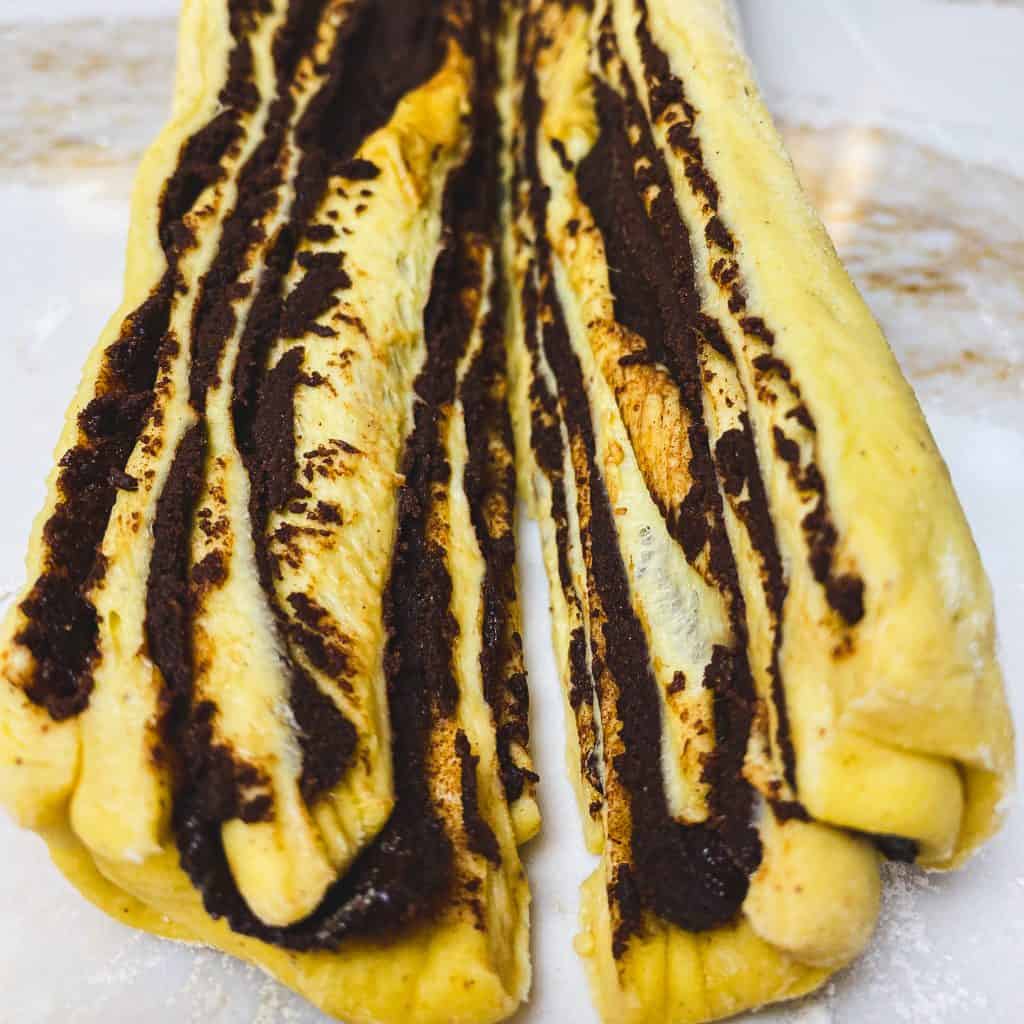
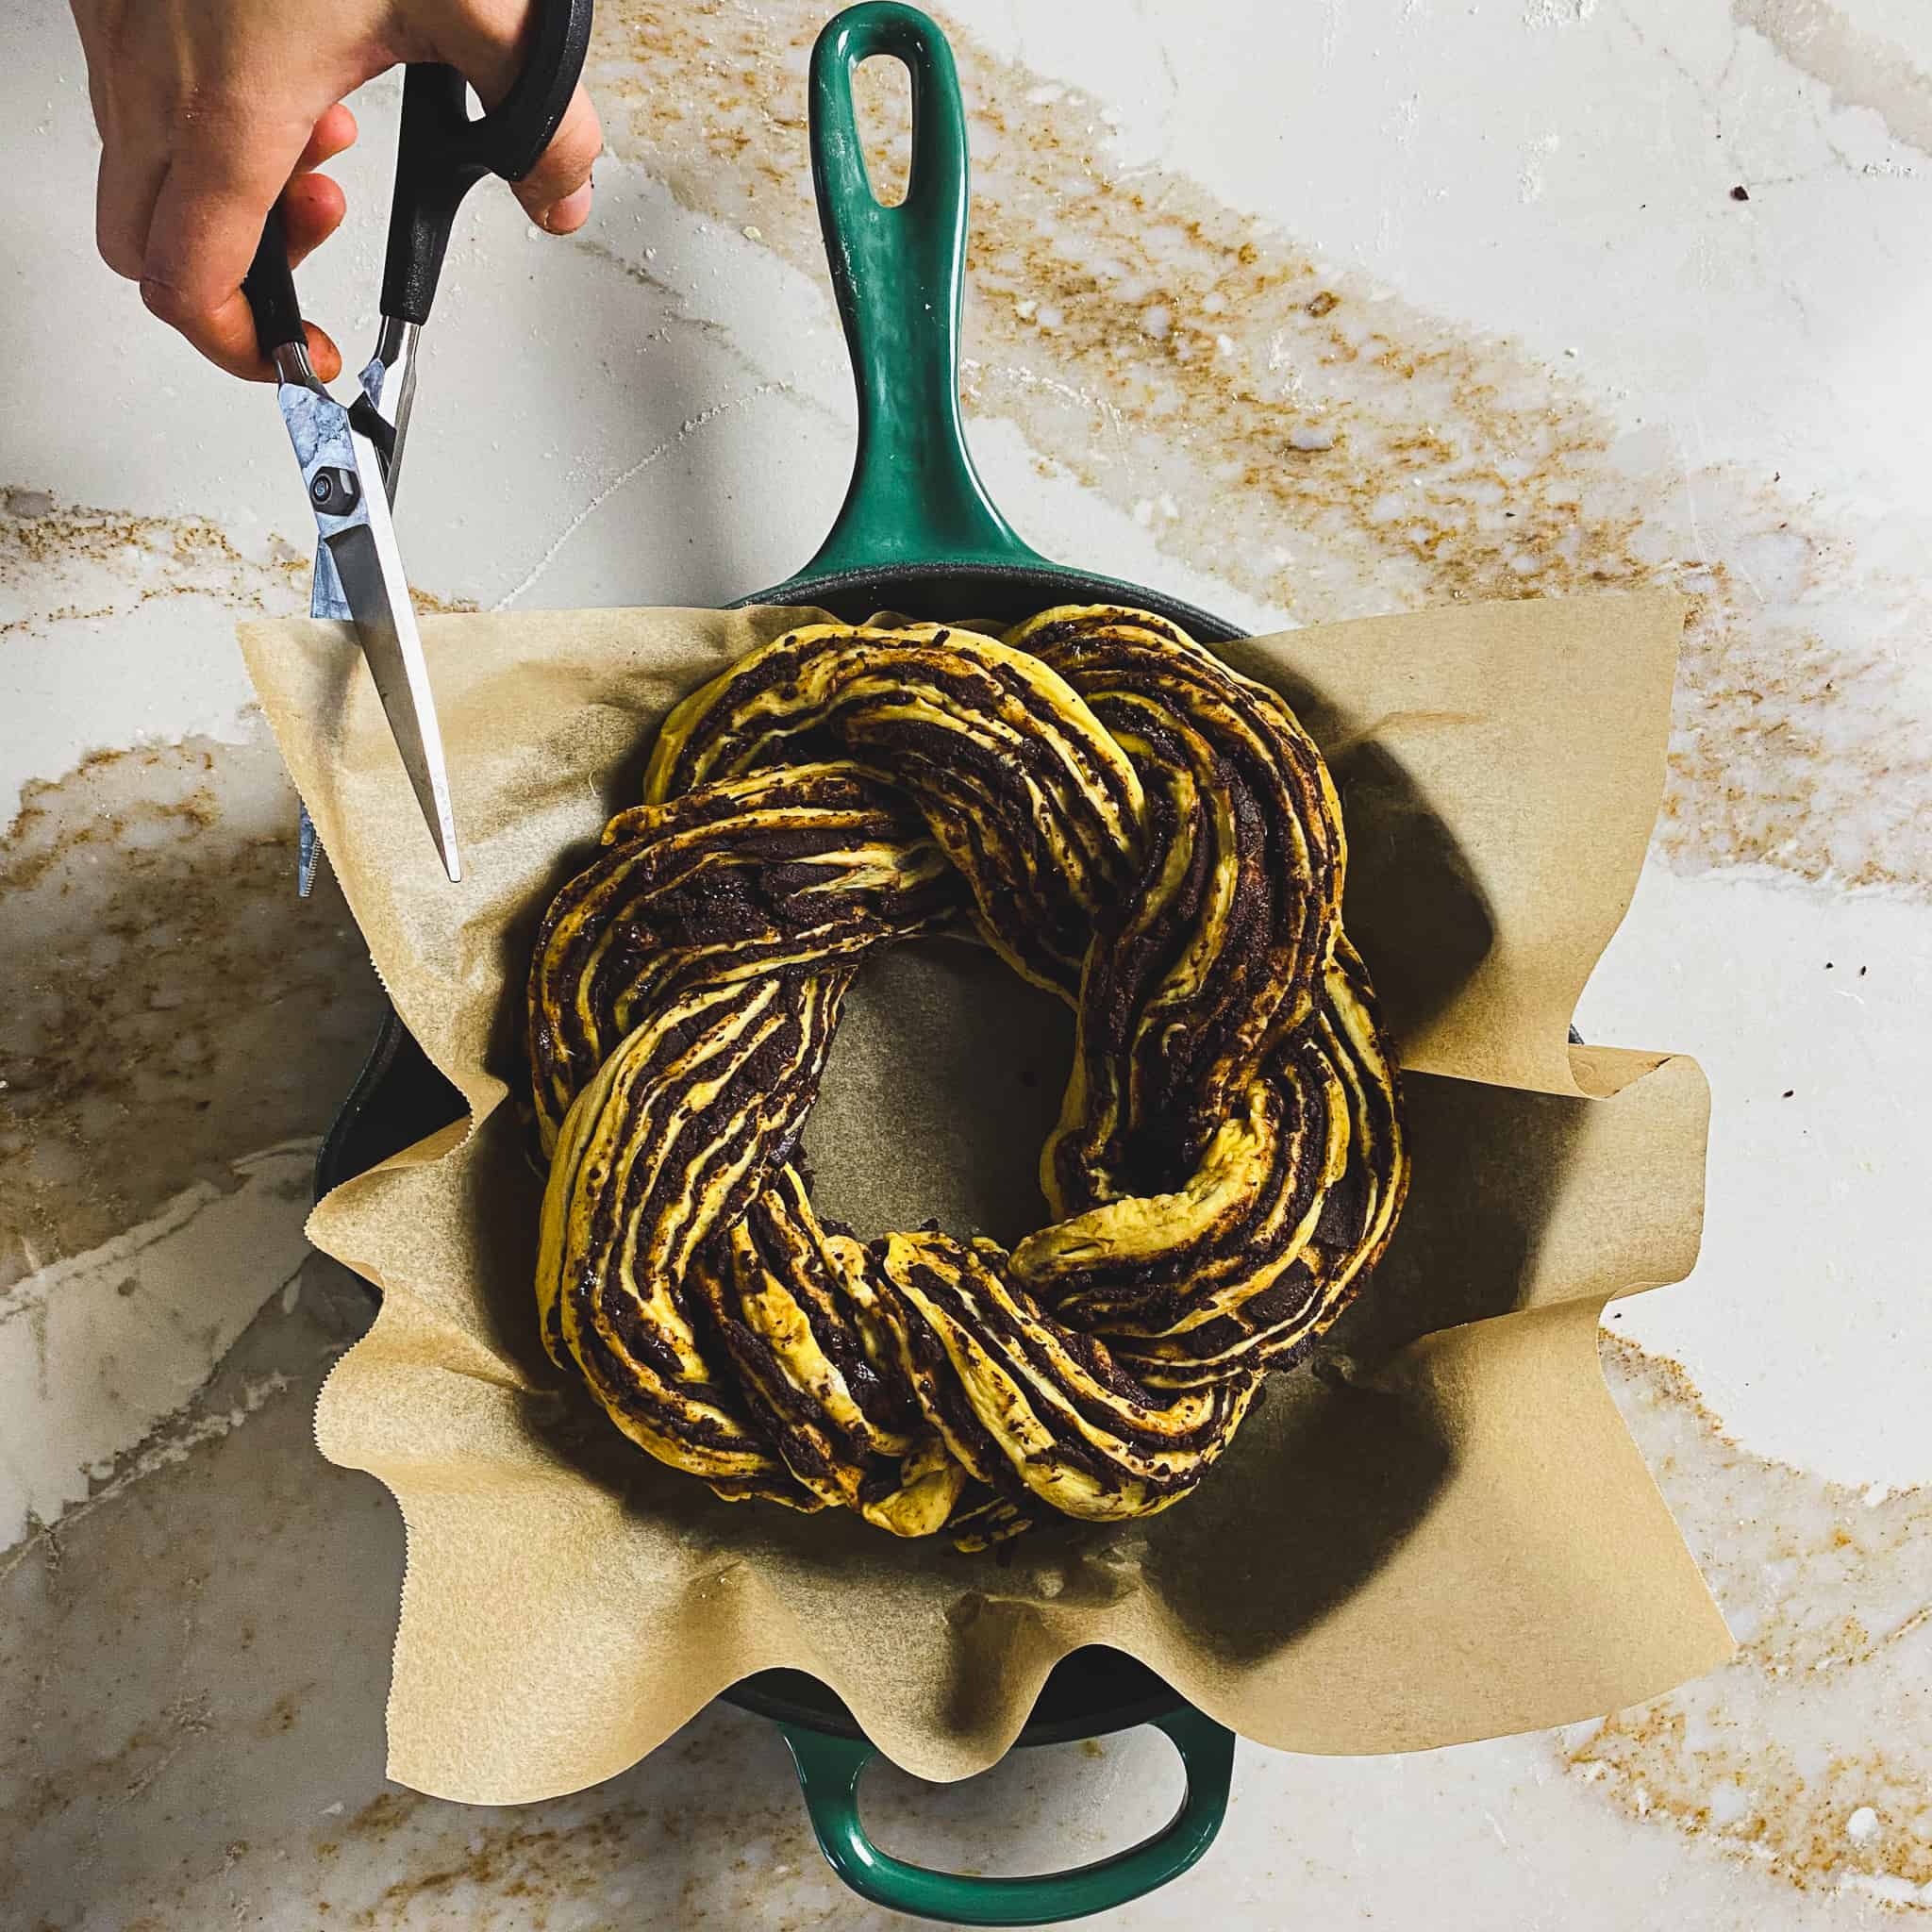
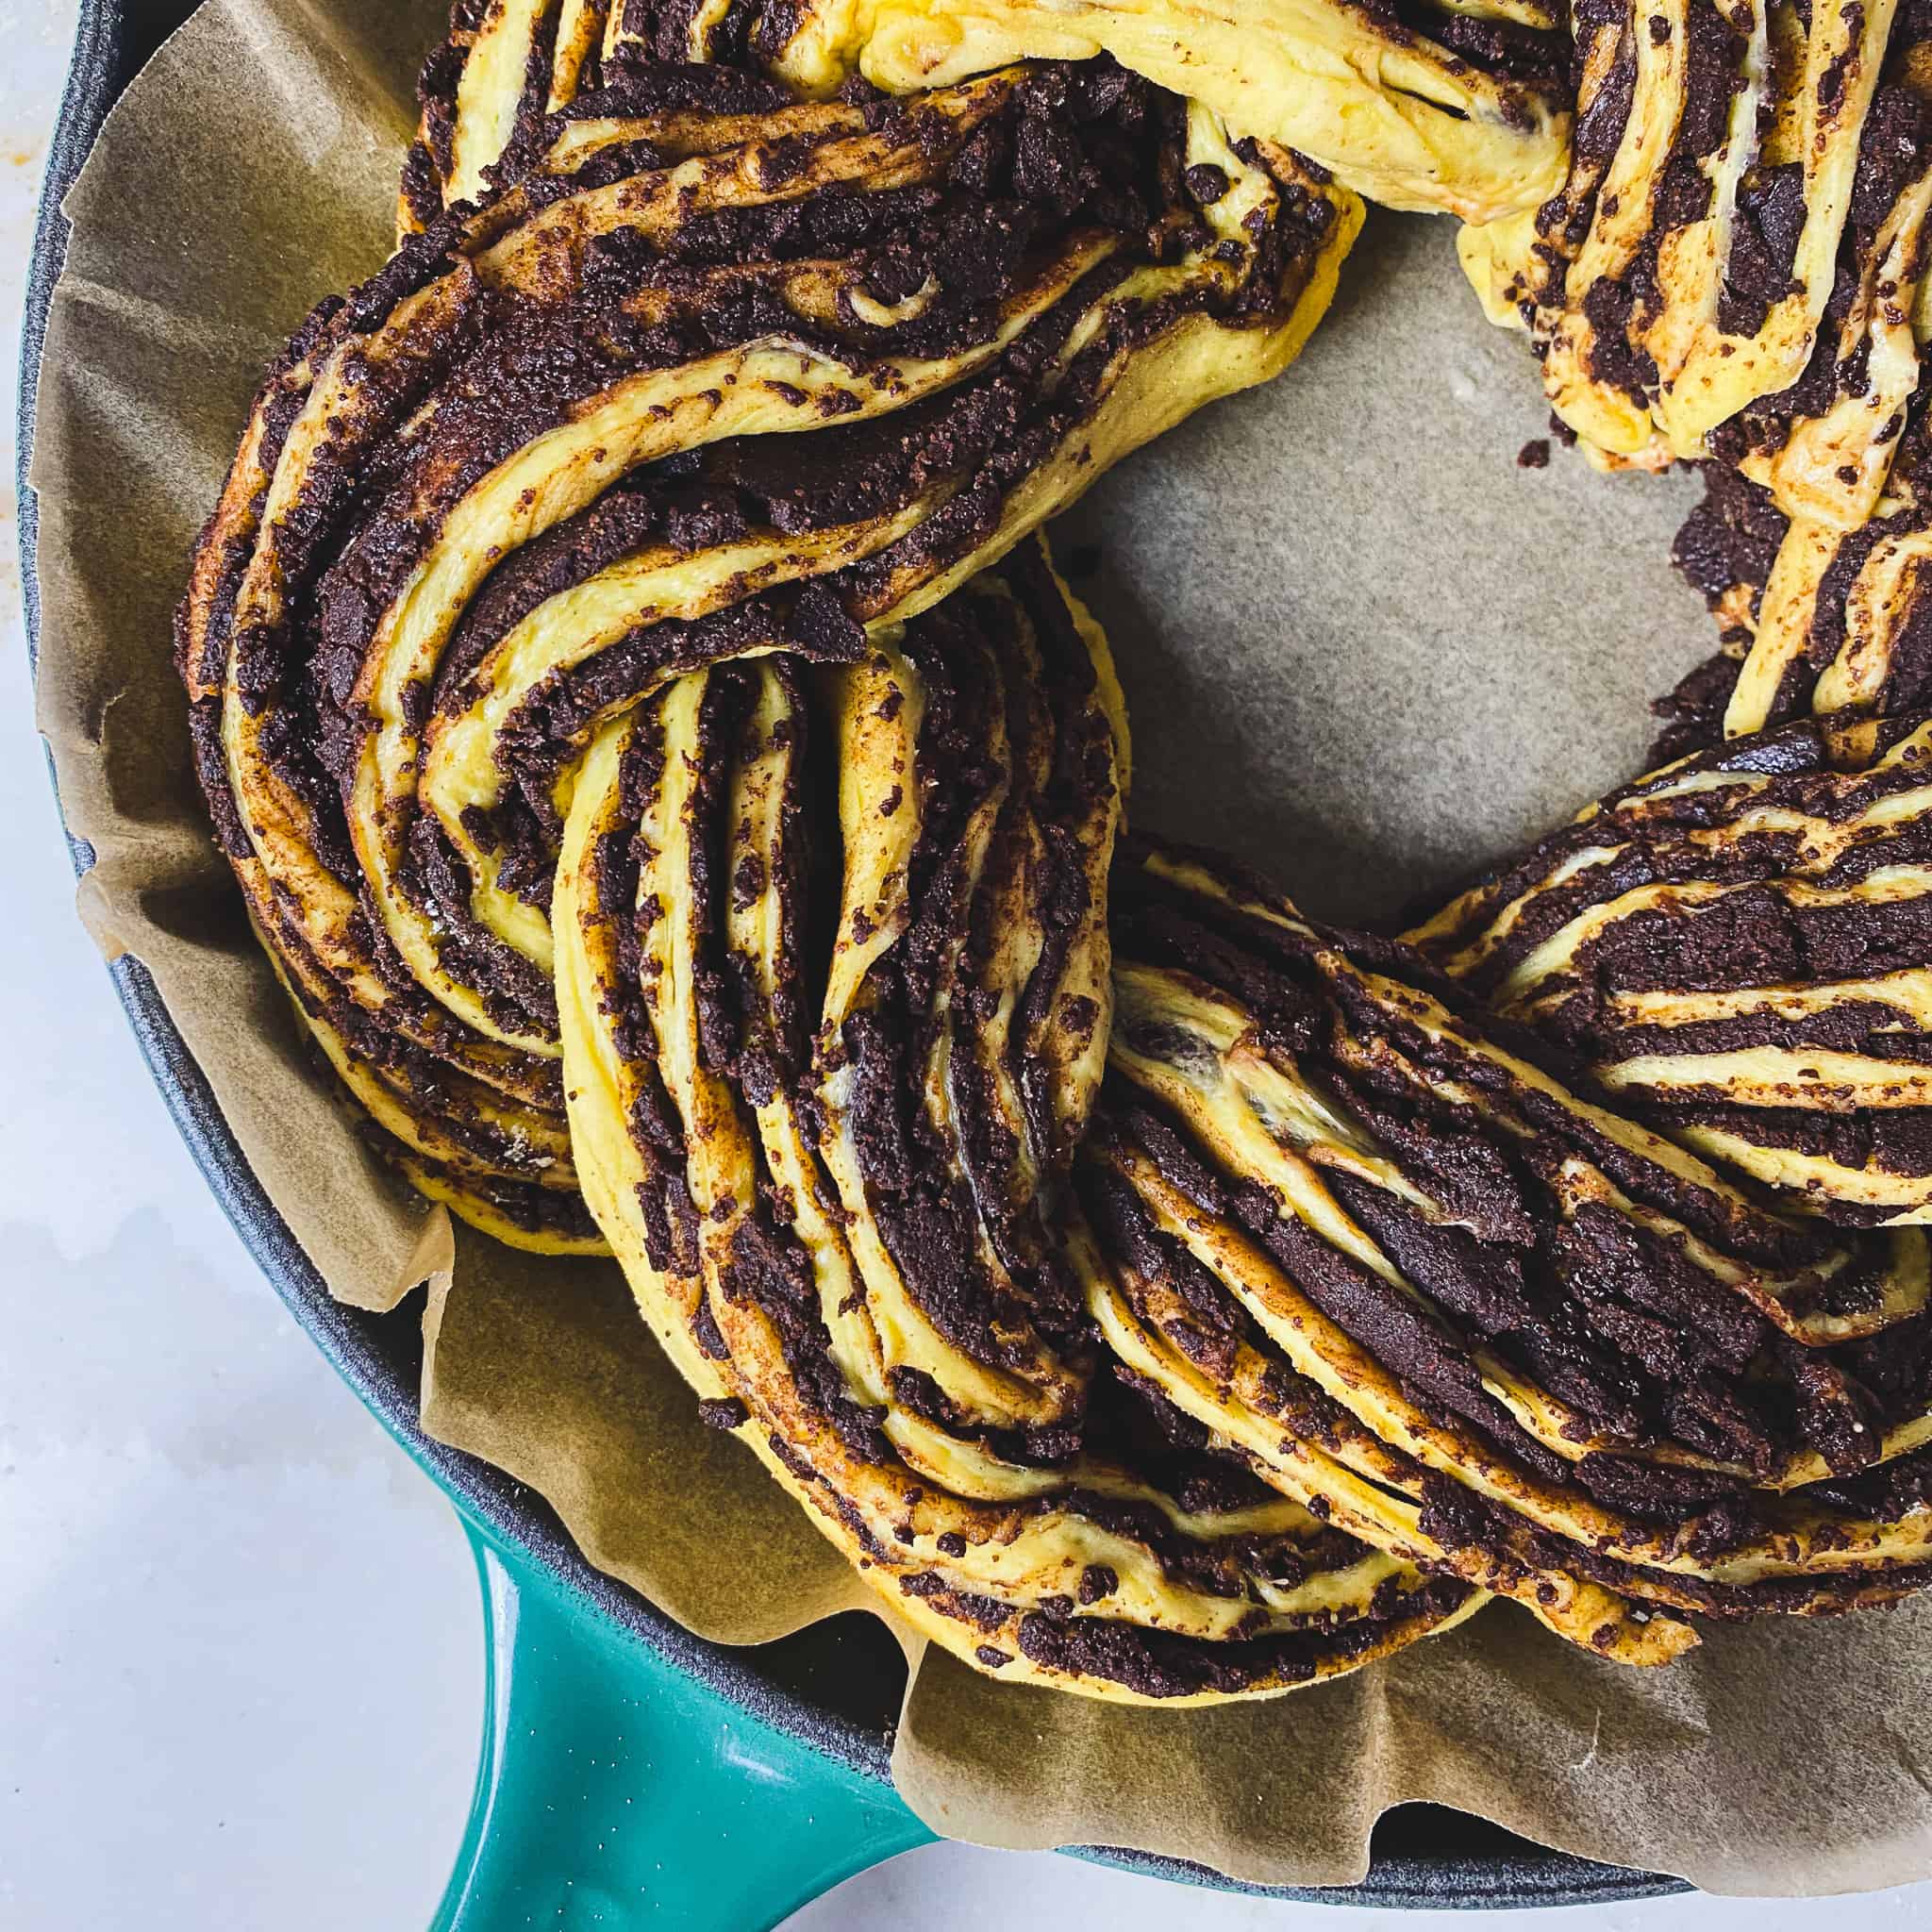
Cut & braid. Cut the roll lengthwise using a sharp knife. Carefully twist and manipulate the halves to ensure that the cut side is always facing up when you are twisting it.
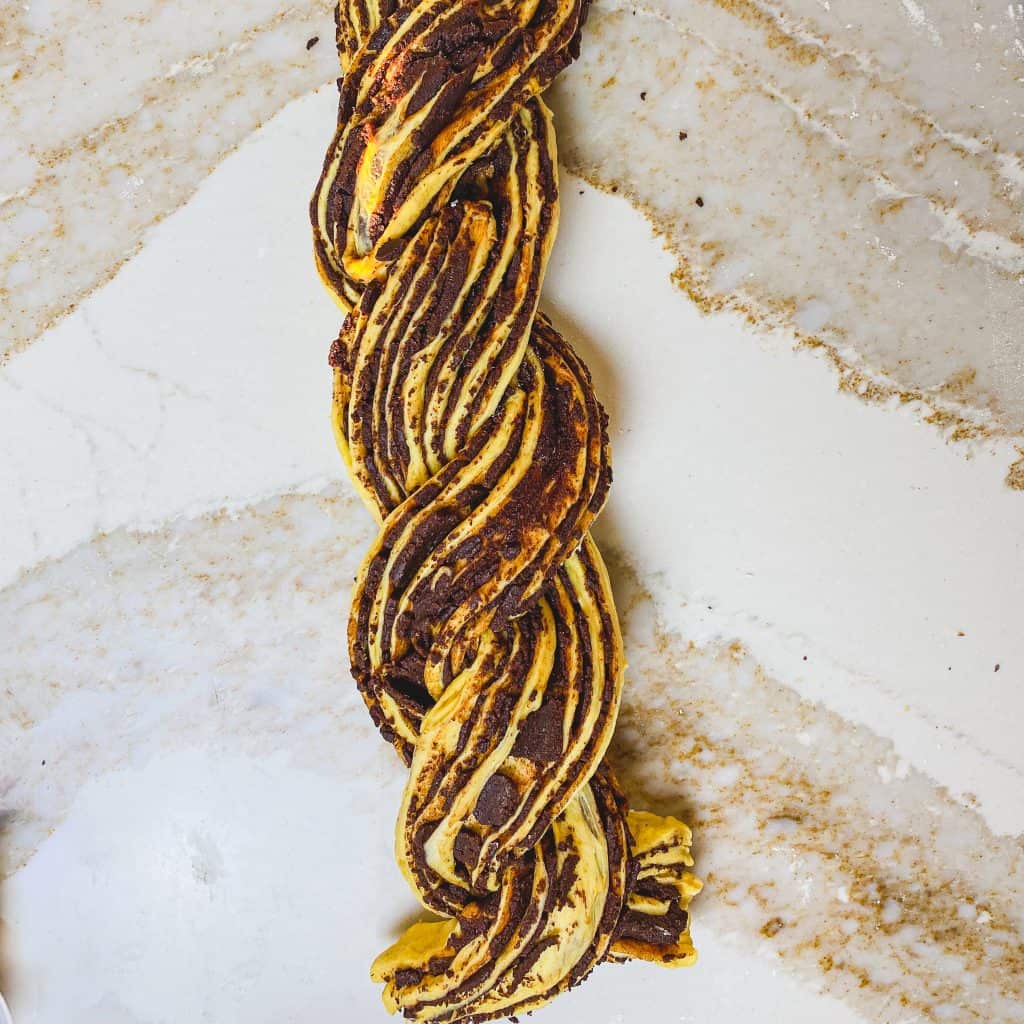
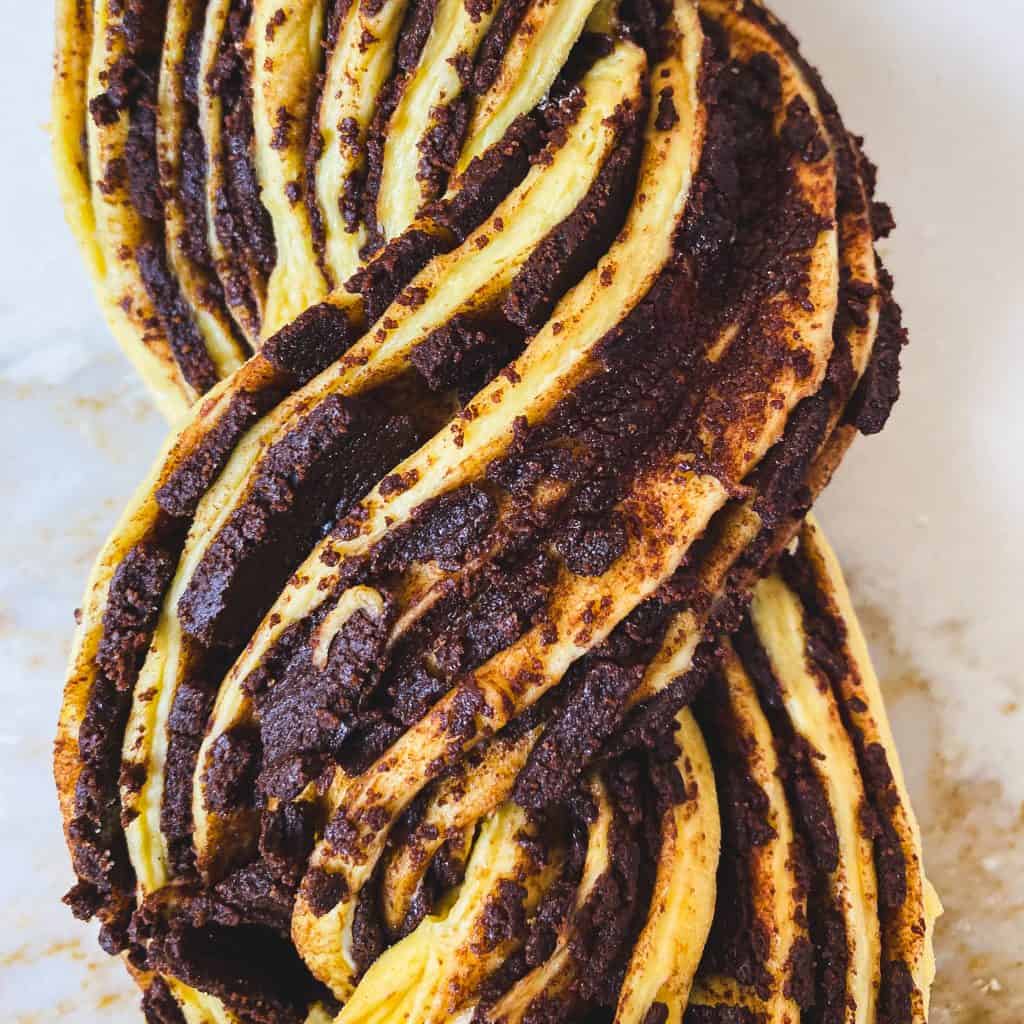
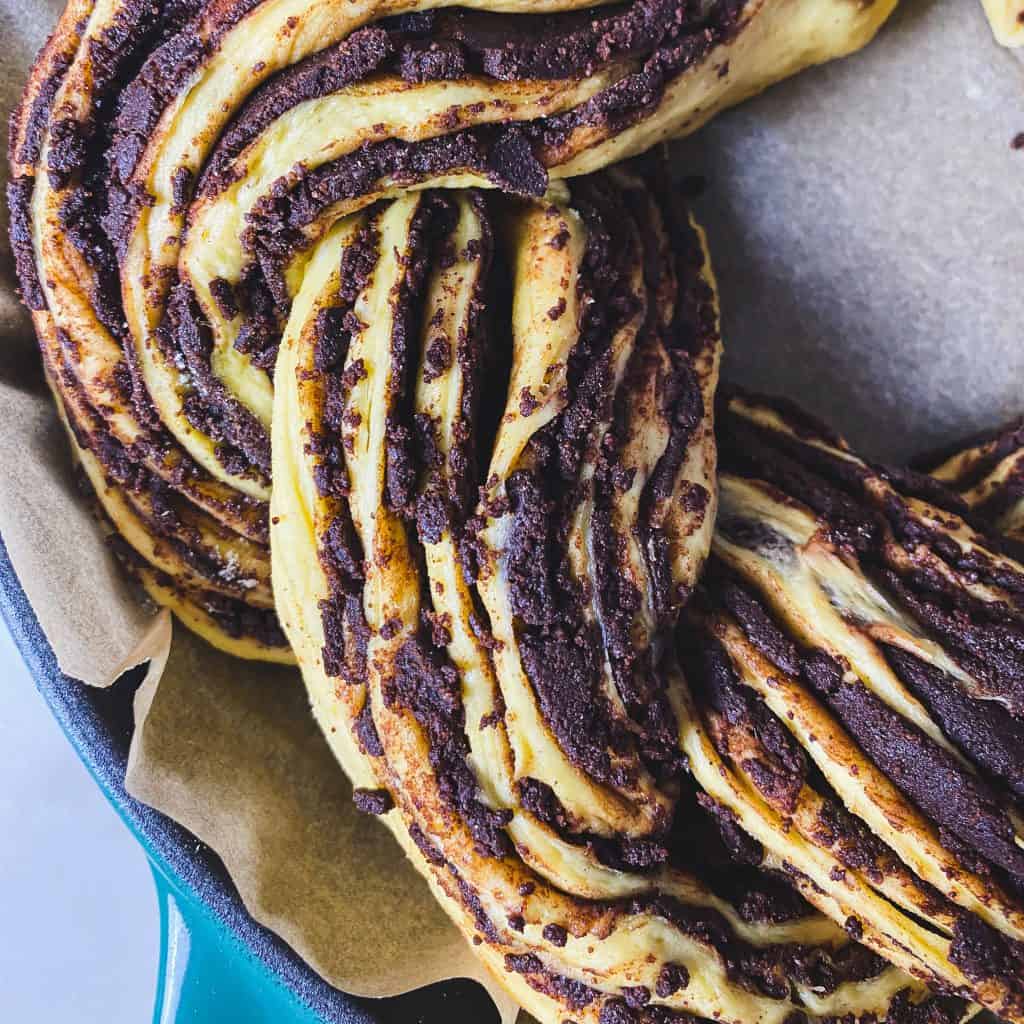
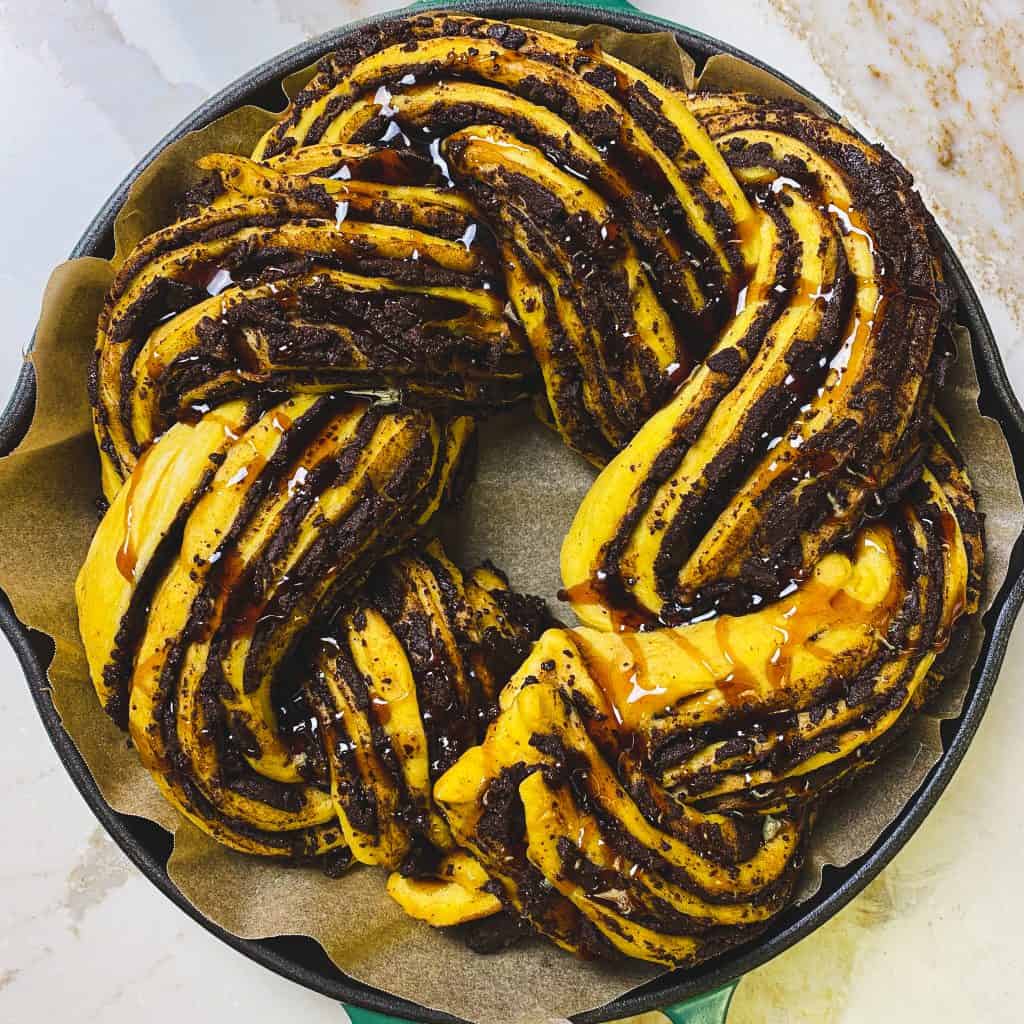
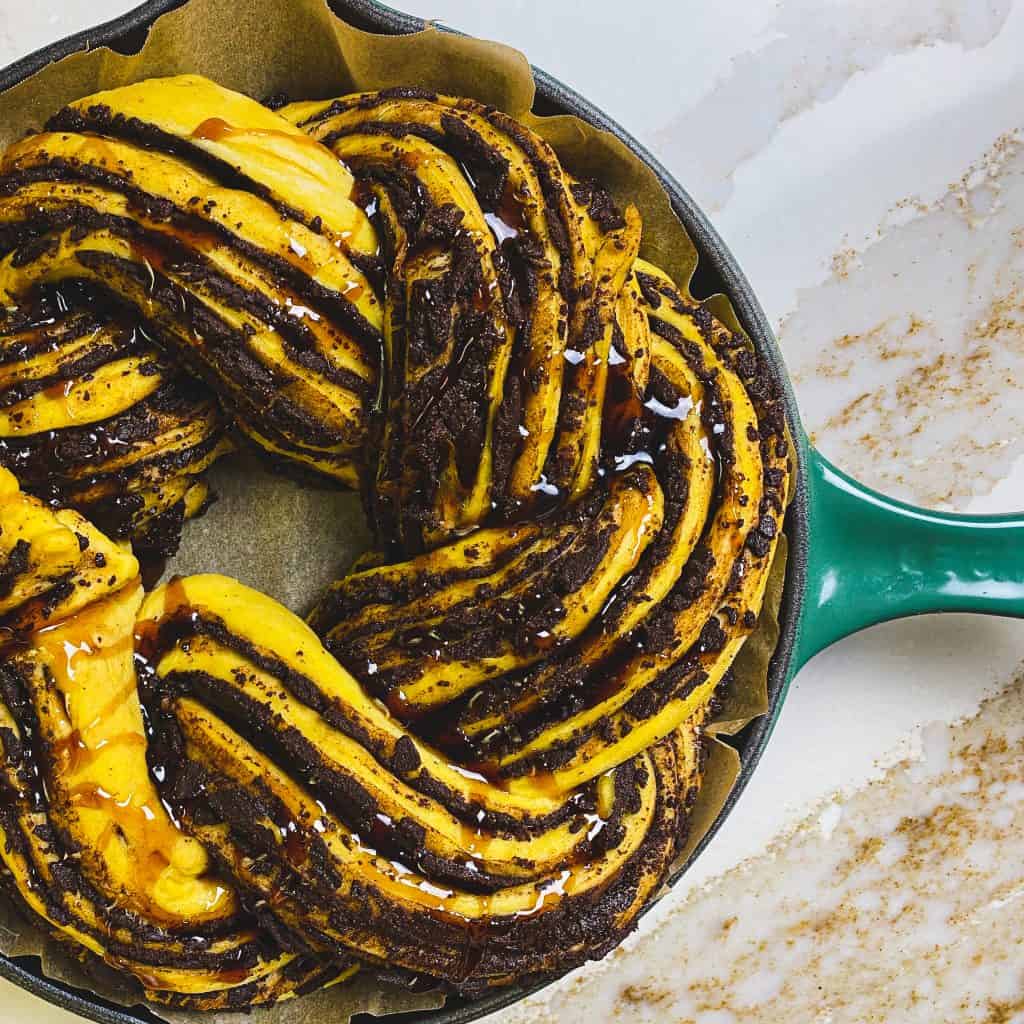
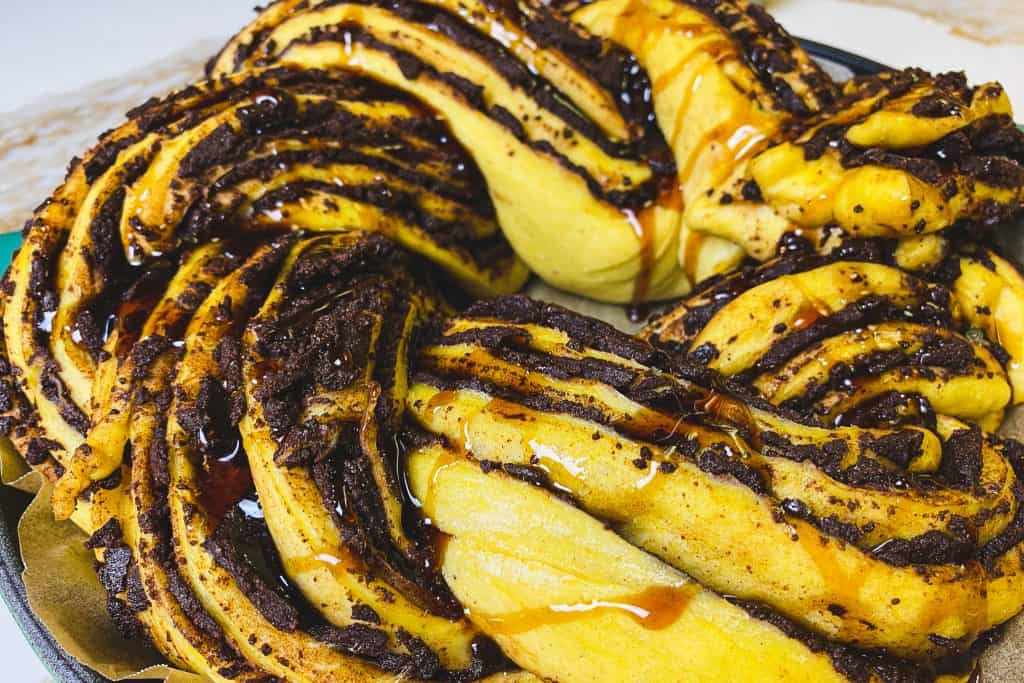
Final rise. Line your pan with parchment and transfer the twisted dough into it in a circular fashion. Don’t be afraid to play around with it until you are satisfied with the finished look. I brushed a bit of water in between the overlapping ends to hold them in place. Let it rise for one hour.

Cook. Preheat your oven to 375°F. Once preheated, cook for 30 minutes.
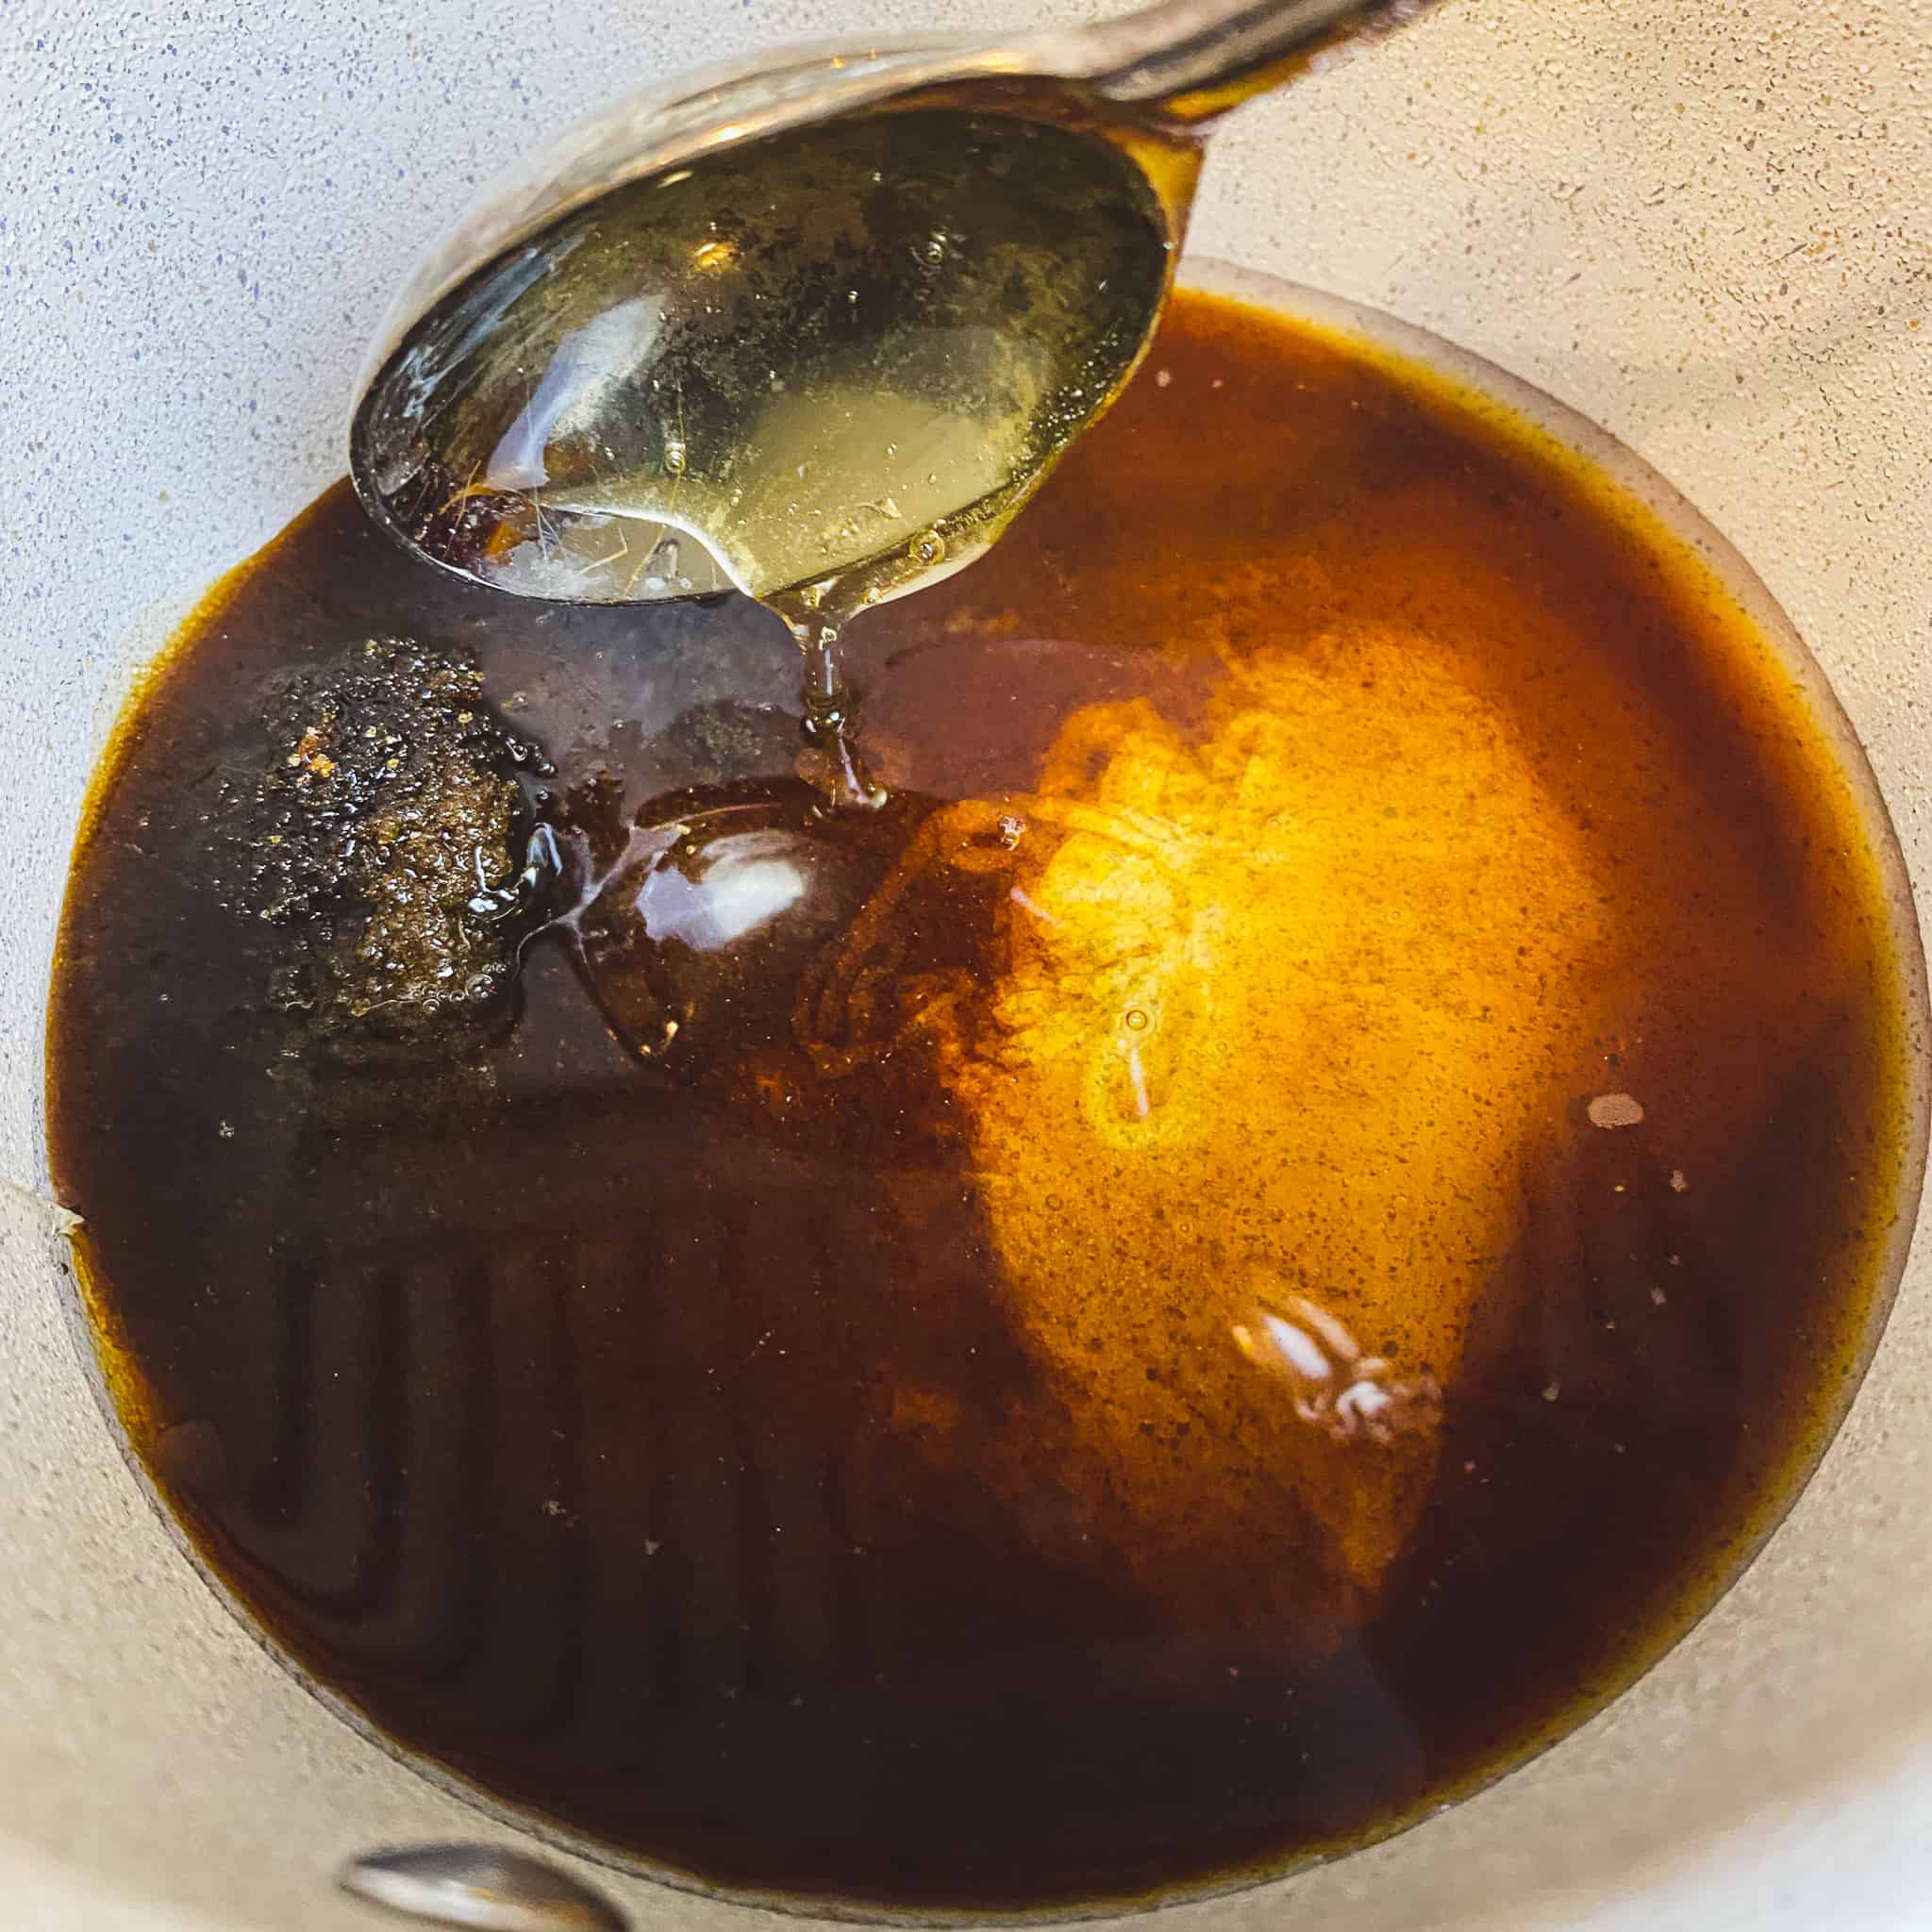
Make your maple brown sugar glaze. While your Pumpkin Chocolate Babka is cooking, make the glaze by adding brown sugar, maple syrup, and water to a medium sauce pan. Bring it to a slow boil over medium heat and allow it to boil for five minutes, stirring occasionally.

Cool + glaze. Immediately remove the Chocolate Pumpkin Babka from your pan and allow it to cool on a wire rack. While it is cooling, either drizzle or brush on the brown sugar maple glaze. Let it cool for five minutes before serving.
Enjoy! You did it! Time to sit back with a coffee or tea and enjoy a slice of this heavenly babka bread. Spread with a bit of farmers cheese, cream cheese, or soft butter or eat it as is- serve warm.
Share the Love! Pin This Chocolate Pumpkin Babka Recipe!

Chocolate Pumpkin Babka Printable Recipe Card
Chocolate Pumpkin Babka Recipe
This Chocolate Pumpkin Babka boasts layers of sweet pumpkin spiced brioche bread swirled with velvety chocolate and topped with a maple brown sugar glaze. Decadent and beautiful, it is sure to be a family favourite.
Ingredients
Dough
- 1/3 cup whole milk, warmed
- 2 teaspoon active dry yeast, also known as traditional yeast
- 1 teaspoon sugar
- 5 tablespoon butter, room temperature
- 1/2 cup pumpkin puree
- 1 large egg
- 1/2 teaspoon salt
- 1/4 teaspoon cinnamon
- 1/8 teaspoon nutmeg
- 1/8 teaspoon ginger
- 1/8 teaspoon allspice
- 1/8 teaspoon cloves
- 2 cup bread flour
Chocolate Filling
- 5 tablespoon butter, room temperature
- 3/4 cup sugar
- 4 ounces bittersweet baking chocolate, roughly chopped
Maple Brown Sugar Glaze
- 2 teaspoon maple syrup
- 1/4 cup brown sugar
- 1/4 cup water
Instructions
Dough + Filling
- Proof the yeast. Combine the yeast, sugar, and warm milk in the bowl of your mixer and allow it to proof for 10 minutes; until you notice it is foamy.
- Prepare the dough. Using the paddle attachment, add in butter, salt, pumpkin puree, egg, sugar, and spices with the yeast mixture and mix well. Your butter will likely be slightly lumpy in the dough at this point.
- Switch to the dough hook attachment and slowly add flour. Mix the dough for about five minutes. You should have a smooth, elastic ball by the end of the five minutes. See note*
- First rise. Place the dough in a clean bowl with a teaspoon of vegetable oil at the bottom. Cover it with a tea towel and allow it to rise in a warm spot for two hours. Your dough should double in size.
- Roll it out. On a lightly floured surface, roll the dough into a rectangle that is approximately 12×20 inches. Gently fold it and transfer to a cookie sheet. Unfold and manipulate the dough to perfect its rectangular shape and size.
- Chill. Cover the dough with plastic wrap and place it in the fridge for an hour to cool it off. This step allows you to spread the filling over it easier, minimizing dough stretching and tearing.
- Prepare the filling. While the dough is chilling, prepare the filling. In a small sauce pan, melt the butter. Add sugar, chocolate, and coco powder and mix until combined.
Rolling + Braiding
- Take the filling and spread it over the dough. Be sure to get filling right to the edge to make sure that every bite is filled with chocolatey goodness.
- Roll the rectangle up on the long edge. Using your finger or a pastry brush, paint a small amount of water along the seam of the roll to make sure that it doesn’t unravel on you. Pinch the seams shut.
- Cut the roll lengthwise using a sharp knife. Carefully twist and manipulate the halves to ensure that the cut side is always facing up when you are twisting it. See process pictures for more detail.
- Line your pan with parchment and transfer the twisted dough into it in a circular fashion. Don’t be afraid to play around with it until you are satisfied with the finished look. I brushed a bit of water in between the overlapping ends to hold them in place.
- Final rise. Allow your Babka to rise for another hour before baking.
- Preheat your oven to 375°F.
- Cook for 30 minutes.
Maple Brown Sugar Glaze
- While your Chocolate Pumpkin Babka is cooking, make the glaze by adding brown sugar, maple syrup, and water to a small pot. Bring it to a slow boil and allow it to boil for five minutes, stirring occasionally.
- As soon as the Babka is cooked, remove it from the pan to cool. Drizzle the glaze on or brush it on with a pastry brush.
Notes
*Depending on the day, you may have to add up to half of a cup of additional flour in order to make sure that the smooth dough is pulling away from the edge of your bowl. Start off by adding small amounts at a time- too much flour will result in a dense bread.
****Make sure that your yeast is not expired!! I have ruined a few loaves of bread trying to use the yeast that I had that was expired. Err on the side of caution and get some fresh yeast for this recipe!
Recommended Products
As an Amazon Associate and member of other affiliate programs, I earn from qualifying purchases.
Nutrition Information:
Yield: 10 Serving Size: 1 gramsAmount Per Serving: Unsaturated Fat: 0g